Tuesday, September 24, 2013

Try It Out Tuesday - Black, White and a little color

Hi all,  Happy Fall!!  In our little corner of the world it was pretty cold today, thanks to a north easterly wind.  BRRRRRR.

For my project today, I've chosen a Kenny K New September release called Harper Blue. Now being Canadian, that could mean a lot since our Prime Minister's name is "Harper".  If you do a Google search for "Harper Blue", it leads you to an upscale Consignment Shop in Ventura, CA. Interesting!

On to Harper Blue, from KennyK's OMG CollectionP1030109 copy©Kenny Kiernan for Whimsy Stamps.  I've chosen to show it in a different setting....... to show that not everything is Black and White.   (Looking at the picture - I don't know what my brain was thinking.....or not thinking -- It looks like a wedding card....without the bride). 

On to the next view.  

I've used a technique called Peek-a-boo card, which shows the image turning into a colored image.  I don't have a tutorial for you, but you can find one here.  P1030114 copy


Don't you just love those shoes......P1030113 copy

Materials used:  Copic White, Tuxedo Black Memento ink, Copic Markers:  E00, E11, R20, E30, E33, E34, R22, R24, R27, E70, E71, C00.  Copper Glitter, Sakura Stardust pen, Cardstock, DP's, Ribbon, Flowers from stash  (Basic Grey, Bo Bunny). Quikcutz ovals and scallop dies.

Til next time, Stamp up a storm, ink up a Whimsy wish, and send it on to someone to make them smile.

Hugs,

madge0902 (1)

Tuesday, September 17, 2013

Whimsy Try It Out Tuesday - Let's Get Inky - background technique

Hi all. What do you do when you're feeling uninspired....??  I reached for my all-time favorite stamp sets, Lavish Flourishes, Time Flies and Vintage Maritime Transportation --  The little black dress for stamp sets by Rainbow Echo Designs for Whimsy Stamps.
We are going to get messy today!  You may want to grab some latex, latex gloves that is. I'm going to show you how to do a truly beautiful background technique that has to be seen up close and personal to be appreciated.
Materials:  Base Card  (8 1/2" x 11" - scored in half), Card front (4" x 5 1/4"), Stamps: Lavish Flourishes, Time Flies and Vintage Maritime Transportation. Embossing Folder**, 3 - 4 Distress Inks***, Anti-Static Bag, Black StazOn ink, Versamark, Embossing Powder, Die Cut machine, heat tool and a blending tool (I prefer to work with sponges).  Whimsy Compass Die, Cardstock from stash.
I am trying to work smart by making 4 cards for a monthly swap I participate in, and use Whimsy Stamps for my cards. Usually my cards entail far too much coloring and embellishments to send for swap cards, today's are going to be classic CAS.P1030042 copy
My card front pieces included 1 white, 1 previously made polished stone, 1 aqua paint chip, 1 beige paint chip and 1 yellow, all cut to 4" x 5 1/4". The Paint Chips are BEHR pinched, borrowed from our local Home Depot. I found them very slick and not wanting to grab color, but they were worth the experiment.
With Black StazOn, randomly stamp images onto the card fronts. Stamp off the cardstock to give the illusion of motion.P1030051 copy
Using a blending tool and your choice of inks, work in an invisible oval.  Start with the lightest color and work toward the edges.  Leaving some of the original color of cardstock. Next work with a medium color, working towards the outer edges. Repeat with the darkest ink, which becomes the most dramatic color.  To get a rich vibrant color on the outer edges, pounce your blending tool instead of blending.
When you are satisfied with your blending, set the inks with your heat gun .  After heating a tissue can be used to remove any residue by polishing the surface.P1030060 copy Colors will become a little lighter with heating the inks.
Take an anti-static bag (or used dryer sheet), and swipe it across the surface of the cardstock to remove any static that will attract embossing powder.
Embossing Folder:  Chose one with spaces between the design.  (Swiss dots would not be a good choice).
Open the embossing folder and swipe your Versamark (or ink resist) ink over the raised design of your folder.  Insert your colored cardstock face down onto the side you applied Versamark.   Close the folder and run through your die cutting machine.
Very quickly, remove the cardstock from the folder and sprinkle with Embossing Powder.  Flick the embossing powder off the cardstock and onto a piece of copy paper or embossing powder tray.  If a lot of embossing powder sticks, a paintbrush can be used to remove excess powder.  Clean your Embossing Folder with soapy water.
P1030063 copy

This picture shows the difference between applying the Versamark to the raised background (left) or the raised design (right).
Heat the cardstock with a heat gun to melt the embossing powder.

A variety of embossing powders can be used to get different effects.  Iridescent Ice would be beautiful for a snowflake embossing folder.
Here are   my finished cards, along with the cardstock, colors of distress inks and embossing powders used.
P1030072
Aqua Paint Chip:
Inks: Stormy Sky, Faded Jeans, Broken china.
Clear Embossing Powder
Stamp:  Vintage Maritime Transportation
Die:  Whimsy Shapeology  "Compass die"
1" Circle Punch (center of compass)

P1030073 copy
Beige Paint Chip:
Inks:  Frayed Burlap, Walnut Stain
Gold Detail Embossing Powder
Stamp:  Time Flies
(This is actually very pretty in real life, but the camera picked up the gold as garrish yellow.)

P1030078
White Cardstock:
Inks:  Broken China, Faded Jeans, Black Soot
Clear Embossing Powder
Stamp:  Vintage Maritime Transportation


P1030081 copy

Polished Stone:  (white cardstock, coral & pink dye inks, Iridescent Glimmer Mist)
Inks:  Spun Silk, Barn Door, Black Soot
Clear Embossing Powder
Flower:  from stash
This card is indeed the most vibrant. The Black corners set off the inks beautifully.
I hope these cards give you some inspiration to try this background technique. 
Until next week, "stamp up a storm, ink up a wish and send it on to someone to brighten their day".
Rubber hugs, Whimsy Wishes,
madge0902 (1)

Tuesday, September 10, 2013

Center Side Step – Try It Out Tuesday for Whimsy Stamps

Hi all, hope you are enjoying the remaining days of summer. This last weekend was pretty sad around this household. My little Michou (14 years old Shih Tzu) became very ill. He had gotten into household garbage and devoured corn cobs – we’ve had 2 weeks of very strange behavior. Finally on Saturday morning I took him in to our Vet Clinic. He was very ill with the later diagnosis that there was two pieces of matter either in his colon or stomach. Today, I went to the clinic and spent an hour and a half just sitting with him. If the blockage does not move, the only other option would be to operate. At his age, it’s not an option. So Missie, my other little Shih Tzu and I spent the weekend trying to console each other at Michou’s absence. Of course DH flew into some isolated Lake near Whitehorse last week, and cannot be reached.P1030018

So on to a happier place! My project for today is a very colorful Autumn Card using the digital image Autumn Delight from StampArt Designs.  Katheryne also includes a bonus pack that you get with the original image.  I do so like rich autumn colors of autumn leaves.  I found a very easy way to color autumn leaves.


P1030012-001 P1030014-001These autumn leaves were found in the digital bonus file.  I printed off 4 sets of the bonus file onto copic cardstock.  A total of 16 leaves.   I scribble colored each leaf with copic markers, YR16, R24, and YG25.   The colored leaves were then cut out individually, looking nice but leaving jagged edges with no definition.  So I took out my Distress Ink (Tea Dye) and sponged color around the edgesP1030016-001  You can see the difference between the two. The distress inked leaves (on right) give the edges definition


Front Side Step Card instr.


For my Center Step Card, I started with a 6" x 11" piece of chocolate brown cardstock. 

1.  Measure in 1.25" from right and left edge.  Draw a vertical line from the 1" mark to the 6.5" mark and cut with an exacto knife.  This will give you a Right, Inside and Left panel. 

2.  Score:  inside panel (only)  at 5.5".  (Mountain Fold).

3.  Score both Right and Left panels @:  1" (Mtn fold); 2"(Valley fold) and 6.5" (Mtn fold).

I matted and added DP to each section (after distressing the edges with Tea Dye ink).  The image was colored, fussy cut, and pop dotted to a torn and distressed piece of Vanilla card stock.  Leaves, Bird, Sentiment and pumpkin were added for embellishments.

A piece of DP was added to the inside of the card for adding a sentiment in the future.  Finished measurement of card is 6" x 5.50" with only a slight depth for easy (cheaper) mailing.  

P1030027I hope you have been inspired to try out

a Center Side Step card.   

Materials used:    12" x 7.5" cardstock. various matts, Generations "Simple Stars" cardstock,  3-D tape, Copic Markers:  E70, E71, E74, E000, E11,R20 RVOOO TR31, YR11 B91, B93, B97, Y38, E97, R27, YL58, YG68, YG25, YR31, RR20. DP is from Generation 6" x 6" from their Simple Stories Line, Glossy Accents and 3-D tape.

Rubber hugs, Inky wishes,

Madge

Tuesday, September 3, 2013

Strawberries anyone?? Try It Out Tuesday for Whimsy

Hi all, I'm back again after not making an appearance last week.  DH whisked me away for a Birthday Dinner as a "surprise" and interrupted my plans to work on a project. 

Here in the Okanagan Valley fruit is very abundant.  Unfortunately, when the fruit is in season, the weather is extremely hot and with all the comings and goings of summer I have always frozen fruit for making something with when the weather and P1030009 copytime permit.  Thus my first project.  Labels for Strawberry Jam, which I intend to make sometime in the next month or two.  The Labels will be perfect for those jars which will be given to friends and neighbors over the holiday season. 

Materials used:

 "Home Made", a July Release from Momas, for Whimsy Stamps, White Avery Labels 05163 (4" x 2") 10.  Memento Tuxedo Black ink, Ranger Antique Linen Distress Ink, Copics:  R32, R27, R46, YG04, G24, G28, YG63.  Stamp positioner.  P1030011 copy (My picture is showing a lot of "blotches", which I realized is the printing on the back of the label sheet).  Because I thought the labels were very stark, I shaded them using a Distress ink. I created a negative mask, by cutting the stamped image from the center of a piece of scrap cardstock.  You can see the piece of tape I used to enclose my cut into the image. I used a stamp positioner to place the stamp on the left side of the label. Distress ink was applied by placing the negative mask over each stamped label before coloring with copics.


For a second project, the same image was used for a CAS card.  P1030007 copy

Additional products used:  White Copic cardstock, Red cardstock, Corner punch, Black multiliner, Post-it notes or Computer weight paper and repositionable tape.

Two masks were created by stamping the whole image onto post-it notes.


P1020992 copy


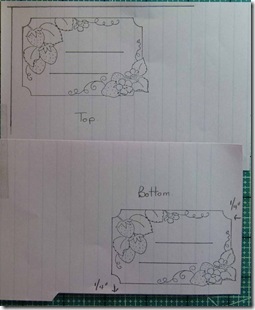
P1030002 copyMeasure and draw a line 1/4" from the outer lines of:  Top left and side, and Bottom right and side.   Cut along lines of the two masks.  It may be a good idea to identify the Top and Bottom masks.


Cut each mask to separate the portion of the image you want to stamp from the portion you do not want inked. 


(Top:  I cut from the end of the line at the right corner, scrolled around the P1020997upper strawberries and then to the end of the line on the upper right). (Bottom: I cut from the end of the line on the right, scrolled around the berries to the end of the line on the upper right)  I didn't want the indentions in the corners to be stamped.


P1030003 copy

Stamping the top left:

Place the (top) cut mask (very precisely lining up the edges) onto the upper left corner of a 5.25" x 5.25" piece of white cardstock.

Using a stamp positioner, place the acetate or glass on the mask (and cardstock).  At this point use some tape to keep the bottom in place.  Place your positioner, remove the top left corner of your mask and stamp the image.

Stamping the bottom right:

Place the (bottom) cut mask (very precisely lining up the edges) onto the lower right corner of the cardstock.  Place your stamp positioner acetate or glass over the image.  Tape the upper part of the mask in place. Place the positioner, remove the bottom right corner of your mask and stamp the image.

A whole image was stamped, cropped and mounted onto red cardstock.  The images were then colored with copics, matted with red and placed onto a 5 1/2" x 11" (scored in half) piece of cardstock.  The bottom left and top right corners looked naked so I took a black multiliner and drew in "corners".

I hope my tutorials gave you some inspiration today to "stamp up a storm, ink up a wish and send it on to someone to make them smile".

Rubber hugs, whimsy wishes,

madge0902 (1)

Tuesday, August 20, 2013

Meljen’s Designs– Victorian Boot Daisies


Hi all!!  Are you enjoying the last days of summer??  Warm water, summer breezes and visiting with company.  The days are getting shorter once again, and it breaks my heart!
I have two designs to show you today with an encore of  Meljen’s Designs Victorian Shoe Daisies.
This image is so easy to color with very minimal effort.  My first card is a 5 1/2 “ x 5 1/2”.  The image was stamped onto Copic White cardstock with Memento Tuxedo Black ink then colored with C4, C7, R05, G25.   The daisy centers were  coloured with a Viva Décor Gold pen. The  daisies were colored with a whte painty pen.   Before removing the oval die I sponged the area with TH Antique Linen Distress Inks.  The background Lace was punched using a MS Border/Corner punch.
I mounted the die cuts onto Cajun Craze Cardstock, adding the two prima flowers with a clear glitter center.

s


Stamp:  Meljen’s Designs Victorian Shoe Daisies
Coloring Media:  Copic Markers:  R24, R27, T3, T7, G82, G85.   TH Spun Silk Distress Ink.
Glossy Accents!!!  (love Glossy Accents)  Flower Centers, Boot Buttons, Leaves.


The second card is an Graduated  Z fold Card. 


As you can see, the card has 3 folds that give lots of Real Estate for stamping and Sentiments!


Basic Card Materials and Instructions: 
Cardstock:  12” x 5 1/4”  and 4 1/4” x 3 3/8”.  (mine is matching (green)).              Score along 12” edge @  3/8”, 4 1/4”, 7 3/4”   (this leaves 4 1/4” on right end)  Use a bone folder to compact the creases…….  Valley, Mountain, Valley folds.
Lay your 12” x 5 1/4” piece of cardstock flat and mark( with a pencil) the following:  Measure down 1” on the  3/8” score line,  and 1”on the 4 1/4” score line – Join the two with a light pencil line.

From the 4 1/4” score line to the 7 3/4” score line measure down 3/8” and join those two marks.  The lines on the top of the card will give you a stair-step effect. 

Place your cardstock on a cutting mat and cut along the lines you just created with an exacto knife, being careful not to cut beyond the score lines of each section.  Snip down the score line to the cut line.


Adhere the 4 1/4” x 3 3/8” piece of cardstock to the 3/8” flap you created.

You now have the basic “Extended” and graduated Base Card. To embellish as you wish.

Supplies:  Meljen’s Designs Victorian Shoe Daisies, cardstock for mats, white, dk green, med green,  TH Green Distress Ink,  Spellbinders Die, Button, and organza bow.   Coloring Media:  Copic markers:  G82, G85, (leaves), BG90 (boot), White Gel Pen (flowers).  Viva Décor Pens (gold – flower centers), (copper – boot heal, toe and buttons). 
I masked and stamped the daisies from the Victorian Shoe Daisies, along the outer edges of the inner mats and colored the flowers, then sponged the edges using TH Green Distress Ink.  A Sentiment was stamped on the two facing inner mats.
I hope this inspires you to “Stamp up a Storm, Ink Up a Whimsy” and send it to someone to brighten their day!
Rubber Hugs, Whimsy Wishes,
Madge

P1020978

Tuesday, August 13, 2013

Try It Out Tuesday

Hi all,  I have two designs to show you today - I've used an image from Meljen's Designs called Victorian Shoe Daisies.  P1020961 copy  The one on the left is simply stamped with Versamark and heat embossed with White.  A black Sharpie pen was used to highlight the toe and heal of the boot, and darken the leaves.  A Gold Viva Decor pen was used to add the centers to the daisies and an Ice White Viva Decor was used for the buttons on the boot. The picture does not pick up the black sharpie highlights under the boot to "ground" it.


The image below was stamped in Memento Tuxedo Black ink onto Vanilla.  Once again I used a Black Sharpie to color the boot heel, toe and buttons.  Copic markers were used to color in the leaves and the main boot.  (E40, E31, E33) (YG91, YG93, YG25).  The boot was pounced with a rag saturated with colorless blender to give a suede effect.  The layers of vanilla cardstock were sponged with Tim Holtz "Old Paper" Distress ink. 

  P1020964 copy

I hope this inspires you to stamp up a storm, ink up a wish and send it on to put a smile on someone's face.

Til next week.

Rubber hugs, Whimsy wishes,

madge0902 (1)

Tuesday, August 6, 2013

*Wanted* - Try It Out Tuesday #24

Hi all.  We are finally back to normal at home after attending a wonderful wedding of our Granddaughter.  It was absolutely wonderful and the weather cooperated perfectly.  Beautiful setting, beautiful bride and lots of "happy tears".  My little "C/J" got married.

I've done a Scrapbook page for this week's project.  A decade ago, when I started scrapbooking, I had a wide format printer - which did not adapt to my new computer, so I had to use 8 1/2 x 11 format...and change it by piecing paper. 

We had three sons, 14 months, and 28 months apart.  It was a handful at times and a ton of fun and adventures.  The three of them would play endlessly with cap guns, water pistols and roping their spring horse.  Unfortunately my pictures have not aged gracefully and enlarging them did not help.  But I thought the idea was cute.

Materials used:  Giddy Up, RED stamp set of 6P1020958 copy, Cowboy Die Set, Cardstock, jute, Silver Embossing Powder, TH Antique Linen Distress ink, words computer generated.  Til next week, "Stamp up a storm, ink up a wish and send it on to someone to make them smile.

Rubber hugs, Whimsy wishes,

madge0902 (1)

Monday, July 29, 2013

Try It Out Tuesday - #23

Hi all, Madge here for another Tuesday - trying out a Kenny K image called "Tex", a new release for July.  I am way ahead of schedule with this one as Denise and some of the DT are baking basking in the sunshine and having a blast at CHA in Las Vegas.  Denise graciously invited me along, but we have a Wedding.......  and if I missed it, my name would be MUDge.
P1020899 copy
Meet "Tex", a July Release from Kenny K.  I have a thing about blue eyes, so I tried to give him those "Paul Newman" eyes......dating myself, aren't I??!!  Can't say I've seen many cowboys walking around without shirts on, but if they are out there -- YEE HA!!
On the inside of the card I wrote:
 "Herd" you like six-packs. 
This one
  • has no calories --
  • is easy on the eyes --
  • is really easy to mail.
There are two gals that come to mind on the Whimsy DT that do the Kenny K images to absolute perfection, Patricia Garcia and LaJenette Garcia.  I don't know if they are related, but these two gals really do justice to the provocative images of Kenny K. 
Materials:  
"Tex" from KennyK's Cool Dude series, for Whimsy Stamps, Cowboy Die Set (Whimsy Shapeology), Copic paper, Memento Tuxedo Black ink, Copic Markers E01, E11, E13, E70, E71, R20, E35, E39, E27, B81, B85, C01, C4, C7.  TH Black Soot, Mahogany, and Antique Linen Distress Inks, Glossy Accents (boots and horseshoes), Inca Gold rub on paste, Card stock, DP and button from stash.
*NEW Cowboy Die Set*NEW Tex
Next week (Aug. 6th) I'm going to step into my box again, but with Scrapbook Pages......  and maybe a Wedding Photo or two...... lol  See you then!
Until next week,  "Stamp up a storm, ink up a wish, and send it on to brighten someone's day".
madge0902 (1)


Tuesday, July 16, 2013

Try It Out Tuesday - #22

Hi all, for another Try It Out Tuesday.  The beautiful weather is finally here, and the weeds are loving it!!  How do they grow so fast?  The lilies are in full bloom and dh is in his glory. 
Today's post is using a new June release from "Little Cottage Cuties", illustrated by Elisabeth Bell called "Tweetest Friends".  She is just sooooooo sweet!!  P1020893 copy
It is hard to tell from the picture that I did some paper tole on the bonnet and dress, mainly because I wasn't happy with my first attempt of colors. The Whimsy DT expert at paper tole is Mariska van der Veer....her creations are fantabulous!
Materials:  "Tweetest Friends",  Cougar White, Tuxedo Black, Copic Markers: Skin:  R00, R20, E11.  Hair:  30, E34, E37. Clothing:  RV04, R81, R83, RV10, E37, E34. Grass etc.  G94, TY05, G20, Y11, Y13. Olba Glue, Lace Border die, Labels die, DP from Webster's Pages, TH Stormy Sky distress ink.
Hope you are enjoying your summer wherever you may be. Next week Denise and some of the Whimsy

DT will be at CHA in Las Vegas with the newest July releases and the newest Whimsy Magazine.  Some exciting stuff!! 
Until next week,
rubber hugs, whimsy wishes,

Tuesday, July 9, 2013

Try It Out Tuesday #21

Hi all, Madge here for another project created with a new June Release from Whimsy Stamps using "Special Friends" by Chrissie Armstrong.P1020891 copy

I absolutely adore the look on this little sweetheart's face. You can feel the adoration she has for her special friend!

It seems that I stamped this image onto some cardstock that is certainly not copic friendly. I have tossed them into the "G" can, but did not have the time to start from scratch with this one.

Materials used:  "Special Friends, Memento Tuxedo Black ink, copic markers:  Skin: R00, E11, E13, R20.  Hair: E11, E13, E35, E39.  Clothing: B91, B93, B95, B97, YG05, YG25, YG01. Horse: E31, E33, E34.  Shading: W0, W1, C0  Flowers: YR20, YR02, R22, G20, G24, G94.  Embellishments:  adhesive Lace Tape and Ribbon from the embellishment section at Whimsy Stamps, tied with cotton thread and that cute little button!!  Go check them out!!  Denise has added some goodies in there that I haven't seen before!!  Now is the time to stock up while they are still available.  Purple Washi tape!!!!  I've been searching high and low for some.......Denise has it in the store!!! 

The cloud background was sponged using torn paper, the edges of the stickers were distressed to add some depth, and the floral corner of the DP was fussy cut (Bo Bunny) to slip the corner of my image behind.

Until next time, "Stamp up a storm, Ink up a wish and send it on to brighten someone's day.

Rubber hugs, Whimsy Wishes,

Monday, July 1, 2013

Sun, Moon and Stars–Try It Out Tuesday

Hi all, for another TIOT.  It is July 2nd and we enjoyed a beautiful hot and sunny weekend of sea air, sun, family and fun. 

Today I’ve used a Rainbow Echo Design Stamp set, called Sun, Moon, Stars, a fun set packed with 4 images and 6 sentiments.  P1020875I’ve done a simple card, which looks really cool in real life, but because of the glitter doesn’t photograph very well.  The stars were embossed with Iridescent Ice and the moon was stamped onto yellow card stock and embossed with the same. All were cut out and arranged around the sentiment, “Shoot for the moon….. Even if you miss, you’ll land amongst the stars.” 

Materials used:  Sun, Moon, Stars, White, black yellow and navy card stock. Memento Tuxedo Black ink, Versamark ink, Iridescent Ice Embossing Powder, Spellbinders Radiant Rectangles and an SU die. 

Thanks for dropping by, we’ll see you next week.

rubber hugs, whimsy wishes,

Tuesday, June 25, 2013

Try It Out Tuesday - Not Fat, Fluffy!

Hi all for another Try It Out Tuesday.  Madge here, "Just Chicken In". A friend's hubby has not been feeling well for a while.......  when I saw this stamp in my DT pkg, I thought it would make an absolutely perfect card to put a smile on his face.P1020790 copy

I used a June Release stamp by Chrissie Armstrong called Not Fat, Fluffy!! (my new favorite saying). To make the inside a little "egg-stra" special, I wrote in "Sorry to hear you've been "Cooped Up!"  Ok, enough sic humor.

Materials used:  Stamps: Not Fat, Fluffy!! SU sentiment, White Cougar Card stock, Memento Tuxedo Black Ink, Copic Markers:  R08, YR68, Y11, Y15, Y35, C0, C4, E21, E29, Y26, Y28. From Stash:  Maribou feather, jute twine, button, microfine black pen, SU embossing folder.  Red and Orange cardstock, Mustard Seed Distress ink (tag).

Misc. Details:   "Chicken Scratch" doodles were penned in around the outer edge of the image and four tiny holes were punched in the hay bale to insert knotted jute.  The little chick in the foreground was stamped, cut out and popped up over the jute.  If I could have found some yellow maribou in dh's fly-tying stuff, it would have been popped up behind the chickies to make them fluffy ......  but no such luck.  I did kidnap a brown one and popped it behind the matted image to add some interest.  Did you notice the chicken track stamp across the bottom of the background?

Hope today is "Egg-stra" special for you, wherever you may be.  Remember, Stamp up a Storm, Ink up a Whimsy Wish, and send it on to someone to make their day!

Rubber hugs, Whimsy Wishes,