Showing posts with label Holly. Show all posts

Tuesday, October 22, 2013

Try It Out Tuesday for Whimsy Stamps -- "Holly"

image
Hi all, is it getting nippy in your little corner of the world? We’ve had sunny days here in the Okanagan Valley, but the warmth sure has vanished. We’ve been busy putting the 5th Wheel, boat, pool and yard to bed for the winter……. So now it’s on to preparations for that Big Day that comes around every December. I’m starting to think ahead, and as usual my brain is going nutz thinking of all the things that have to be accomplished.clip_image002
Have you a stamp that you absolutely adore?? I have a couple of hundred! One absolute favorite Christmas stamp is a "Holly" a Wee Stamp in the Whimsy Store . She is soooooo precious.
This is a “Nugget Box” made to be filled with 9 Hershey Nuggets or whatever you’d like. P1030120image
Materials: “Holly”, Copic White Cardstock, Tuxedo Black Memento ink, Copic Markers: R00, E02, R20, E30, E50, E53. E35, E27, W1, W3, R37, R39, R27, YG63, YG67, Y18. Ice White Viva Décor pen, Sakura Stardust pen, Glossy Accents, Whimsy buds, Brads, Rick Rack, Oval and Scalloped Oval dies, Fern punch (MS),  Red, Green cardstock, Metallic Gold cardstock, and DP from Stash.
Dimensions of the card: 6 1/4" x 5 1/4".  Card Base:  11" x 6 3/8" - score at 5 1/4" and 5 7/8", leaving 5/8" to wrap around box.
Inside of box:  2 pcs white c/s 6" x 8" and 2pcs white c/s 5" x 8", scraps of white to die cut Lace Doily Corner I, Scraps of Red Cardstock cut to 1/4". 
Here is a tutorial for a Book Card Nugget Box, I hope mine has given you some inspiration to Try It Out.
madge0902 (1)


Monday, February 11, 2013

Great News to Share and an "FBS" Card and Kit

Hi all,  to those of you who do pop in from time-to-time, I have fantastic news to share!!  I have been given the honor to design for a Newsletter for WHIMSY STAMPS!  Yea!!  I've been sitting on the news for a couple of weeks - and I'm a little excited!!
My first post for the Newsletter and I'm a wee bit nervous (ok, a lot).  Anxiety stress, is the worse kind....lol. Here in the Okanagan Valley, easel openwe have beautiful sunny days - with snow all around us - and later in the season we even have flowers blooming with snow heaped up in our yards.  Bizarre!  The end of winter is also the end of flu and cold season.  I've chosen to make a "FBS" kit.  FBS, you ask?  Feel Better Soon.  I've topped it with an easel card using the absolutely adorable stamp, Holly", before I put it aside for the season.  She is also a little fairy.... and the mere thought of a fairy makes one feel better in an instant - especially this little cutie.
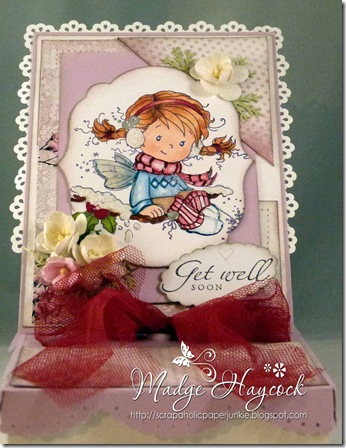
You might notice the difference in my image from the original stamp - because I did Mirror image stamping to reverse the image.  
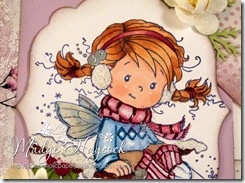
image close up
I shall skip the part of how I constructed the front as it is quite self-explanatory.  easel down
I had a "FBS" kit in mind when I created this project.  I downloaded some beautiful papers from Whimsy's digital paper collection "Digital Magnolia Spring Blossom Papers", from the ever-so-talented Michele R.  Oh my, soft colors, subtle and beautiful!  Talk about instant gratification!!
A box to fill with "FB" stuff was next.  Kleenex, hand cream, lip balm, and stash teas were the items that came to mind.  inside box Some careful measuring, and not so careful cutting, gave me a box bottom that fell 1/8" short of the little pkt. of Kleenex.  Not to worry - the Kleenex fit sideways.
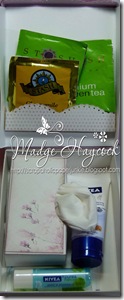
Note:  I made a little wrapper from more of the Spring Blossom papers to pretty up the Kleenex.
Tip:  Perfect weight for a sturdy box bottom is a cereal box or the "lightweight chipboard" from the back of those 12" x 12" paper pads. 
My box measures 4 1/4" x 6" x 1 1/2, giving me enough real estate to put my items into.  (4 1/2" would have been better) (groan).
I wanted a drop-down lid that would act as a cover to P1020068fall into place over the contents.  2 1/8" was added to both sides of the box measurements. I then scored the box measurement in the center of the card stock.  I lined up a border punch (EK Success), folded the corners, and glued them to make a fitted lid (like a fitted bedspread).  (I added the flatback pearls to cover up a small rip).
The back of the box was hinged to the back of the easel card to join them. P1020072 The top was decorated with more of those luscious papers of Michele's and a soft cranberry toule bow was added on top of a pop dot for a "stopper".
Supplies used:
Xpress it blending card
Memento Tuxedo Black Ink
Copic Markers: Skin:  R00, E11, R20  Hair:  E30, E31, E34, E37  Scarf & warmers:  R81, R83, R39  Sweater:  B91, B93, C1  Leaves & Branch:  YG63, YG03,  E53, E49,
Misc. (wings)  Sakura Stardust Pen, (snow) Matte White Glossy Accents and White Embossing Powder, SU die cut; Get Well Stamp, fern punch, MS Border punch, EK Success border punch, card stock from stash, sewing machine.
I hope you enjoy my finished project - I had lots of fun (and frustration) getting it to work.  A tree was definitely harmed in the making of this project.  lol
"Remember, stamp up a storm, ink up a wish and send it on to someone to make their day".madge0902 (1)


Wednesday, December 19, 2012

Have a Jolly "Holly" Christmas

Hi all, Madge here for another Wonderful Wednesday at OCS.  I'm in panics-ville mode as the "Most Happiest Day of the Year" approaches.  I've decided to kill two birds with one  stone for my post today........  Double Duty, so to speak.P1010902 copy
I've chosen the beautiful  Whimsy Stamp, "Holly" - available at OCS and turned her into a Nugget Candy Card filled with a Hershey's Nuggets surprise for a very sweet friend.  This is #9 with three more to make before "the big day".  These will be hand delivered - unlike two that were mailed!  Yikes, that was expensive!
I Stamped the image with Memento Tuxedo black ink onto Xpress It blend Cardstock and colored it with my favorite medium.....copic markers.  Cardstock layers are from a stash of paper scraps that I have been neglecting to use.  (I won't bore you with details).
Whimsy's "Holly" stampCopic Markers; Memento Tuxedo Black ink; P1010890Viva Decor pen (snow); Cherry Lynn Fanciful Flourish;Glossy Accents; Stickles (on flowers) and Brads, flowers and punchies from stash.
I apologize, but once again my links do not seem to be working without giving me an error message...... grrrrr. 
I want to wish all of you  A Very Merry Christmas  - from our house to yours. See you here next week.
siggyhaycock

Wednesday, November 21, 2012

Whimsy's Holly

Hi all,  Madge here for another Wonderful Wednesday.  I was very reluctant to post my project for this week as Shari (our Terrific Tuesday girl), did a absolutely marvelous project using the same image.  (We both have excellent taste - !!  Amazing how two images the same can turn out so differently. 
I stamped my image on Copic Xpress It Blend Cardstock, with Tuxedo Black Memeno ink, colored it with copics and die cut the image.  Barn Door distress ink was sponged onto the die cut to give it a bit of color.  I also added some machine sewing and then sponged on Versamark and applied White Embossing Powder.
P1010846 copy
Materials used:
Holly from Whimsy Stamps
Xpress It Blend Cardstock;
Memento Tuxedo Black ink
Copic Sketch Markers
 Tim Holtz Distress Ink (Barn Door)
White Viva Decor pen;
Spellbinders and Memory Box dies
White Embossing Powder

Happy Stamping!