
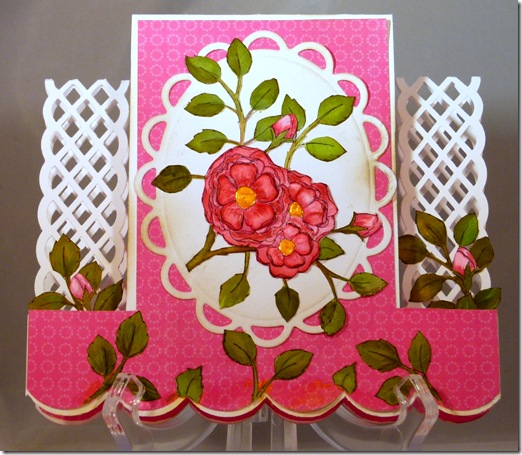
Hi all, for another "Try It Tuesday" for Whimsy Stamps. I've constructed a Center Step Card for you today using a set from Monika Martinson (Momas) called Build a Rose Bush.

I don't have a tutorial for you today, but I will give you the measurements.
I started with a piece of 6" x 11" white cardstock. I used 100lb weight cardstock for a sturdy card. (The EK Success Lattice Border punch measures 1 1/4". ) Both the left and right side were punched on the long edge, starting at 1 1/2" from bottom to 1 1/2" at the top. If not punching - then cut a line - by measuring over 1 1/4" and cutting a vertical line from 1 1/2" bottom to 1 1/2" top. The 3 1/2" Center panel was scored in half, at 5 1/2". A mountain fold was created at the 1 1/2" mark for each side panel and a valley fold 1" from that. Close your card at this point and it will create a natural fold for the two side panels. A spellbinders die was used to create the scalloped bottom edges. The white panels are matted with a Bo Bunny DP. The image from "Build A Rose Bush" was stamped onto Cougar White cardstock for copics with Memento Tuxedo Black, colored with copic markers and die cut using the overlapping image technique. The inside is matted with the same Bo Bunny DP with a Scalloped Circle stamped with "Life is a sweet bouquet of special moments"
I'm not totally happy with this card and if I had another 4 hours, I would do it over from scratch, but I do need to sleep:( I'm hoping that you will take the Center Step card idea and try one for yourself. Finished card measures 6" x 5 1/2" and folds flat for mailing at regular postage.
Materials used: Build A Rose Bush, Cougar White Cardstock (for copics), Memento Tuxedo Black ink, Copic Markers: RV10, RV21, RV23, RV29, YG93, G40, YG63, YG97, Viva Decor Gold Pearl Pen (centers of flowers), Tim Holtz Frayed Burlap, Spellbinders large scallop die, and oval die, EK Success Lattice Border Punch, Bo Bunny DSP from stash.
Remember, Stamp up a Storm, Ink up a Wish and send it on to someone to make their day.


I don't have a tutorial for you today, but I will give you the measurements.
I started with a piece of 6" x 11" white cardstock. I used 100lb weight cardstock for a sturdy card. (The EK Success Lattice Border punch measures 1 1/4". ) Both the left and right side were punched on the long edge, starting at 1 1/2" from bottom to 1 1/2" at the top. If not punching - then cut a line - by measuring over 1 1/4" and cutting a vertical line from 1 1/2" bottom to 1 1/2" top. The 3 1/2" Center panel was scored in half, at 5 1/2". A mountain fold was created at the 1 1/2" mark for each side panel and a valley fold 1" from that. Close your card at this point and it will create a natural fold for the two side panels. A spellbinders die was used to create the scalloped bottom edges. The white panels are matted with a Bo Bunny DP. The image from "Build A Rose Bush" was stamped onto Cougar White cardstock for copics with Memento Tuxedo Black, colored with copic markers and die cut using the overlapping image technique. The inside is matted with the same Bo Bunny DP with a Scalloped Circle stamped with "Life is a sweet bouquet of special moments"
I'm not totally happy with this card and if I had another 4 hours, I would do it over from scratch, but I do need to sleep:( I'm hoping that you will take the Center Step card idea and try one for yourself. Finished card measures 6" x 5 1/2" and folds flat for mailing at regular postage.
Materials used: Build A Rose Bush, Cougar White Cardstock (for copics), Memento Tuxedo Black ink, Copic Markers: RV10, RV21, RV23, RV29, YG93, G40, YG63, YG97, Viva Decor Gold Pearl Pen (centers of flowers), Tim Holtz Frayed Burlap, Spellbinders large scallop die, and oval die, EK Success Lattice Border Punch, Bo Bunny DSP from stash.
Remember, Stamp up a Storm, Ink up a Wish and send it on to someone to make their day.


