
To all of you in the US, I hope you had a marvelous long weekend enjoying Memorial Day. Here in Canada we had our long weekend last week and the weather actually cooperated.
Last week I mentioned attempting to make a card from one large circle - The ideas started flowing from my one idea and I must say, I ended up with something that is quite different from my original thoughts.

I started with an 8 1/2" circle (cut from a salad plate). Then someone turned the light switch on and I remembered I have a Cricut (sheesh)!
My sample will be using an 8 1/2" scalloped circle cut from DSP.
This is long and involved so run and take a potty break and grab a cuppa.....
Version ONE and TWO to follow........with the hint of VERSION THREE.
Start with one large circle:
You will also need:
Scoring tool, bone folder, ruler, pencil and scissors.

Step One: I started with an 8 1/2" scalloped circle. Regardless of the size you start with, scalloped or not, score a horizontal line 2/3 of the way down your circle, (which will be the height of your card). Mine will be 5 1/2".
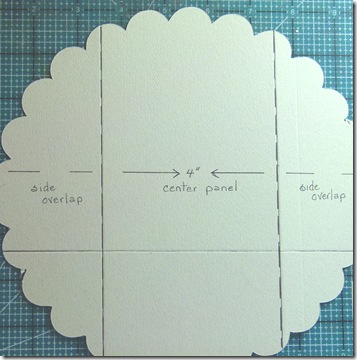 Step Two: Divide your circle into three parts vertically making the middle section slightly less than the sum of the two sides. ie: 2 1/8", 4 and 2 1/8".
This is where my card took a different turn as to what was originally intended. I had planned on using the image I used, but the idea of a shell popped into my brain.
VERSION ONE:
My Step Three: I scored at 2 1/8" and 6 1/8" on the bottom section below the horizontal score line.

Step Four: Mark the center panel in half along the horizontal score line. Score diagonally from the lowest points of the scallops in only the right and left sections to the center point.

*** Correction: The bottom Mountain Fold is a cut to 1" from center mark on each side leaving 2" for a hinge.
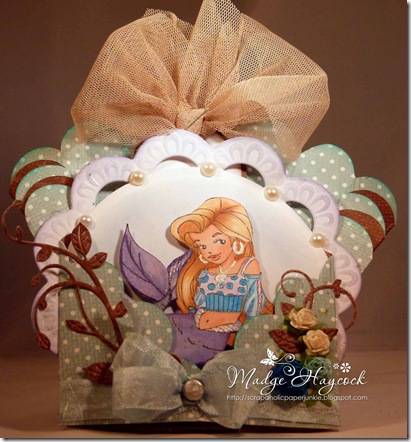
Here is my card once again. As you can see the fanned effect has disclosed the other side of the DSP.

This shows the gatefold open exposing all of the Elisabeth Bell image, "Bonita", which was cut out and pop dotted onto a circle die and sponged with Lavender ink. The sky and a land scene were sponged on with TH Distress Inks.

A tag with a big fluffy brown toule bow was added, along with a sea green taffeta bow and pearl brad.
Materials and Supplies:
May Release "Bonita" by Elisabeth Bell, Cougar paper for copic markers, Copic Markers: R00, E11, R20, E50, E31, E33, E34, V00, BG10, BG43, V00, V04, V15, C1, C4. Sakura Glitter Pen, Vines Die Set and Assorted flowers from Whimsy Buds. From stash: DSP, tag die cut, toule, taffeta ribbon, brad and flatback pearls.
Now back to the original plan....... VERSION TWO
Step Three: Cut along the horizontal score line to the vertical score line from left and right side. The center panel remains scored.


Step Four: Crease fold lines with a bone folder. Remember, innie goes outie - meaning indention of score line faces out.
Step Five: Overlap top left and right flaps.
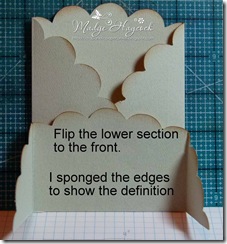
Step Six: Flip lower section to the front. At this point you can adhere this section to the back making a pocket.

Step Seven: It is your choice to adhere the front gatefold to the back gatefold or close with a bellyband.
How about VERSION THREE using an 8 1/2" x 8 1/2" piece of DSP. Following the same principal it would become a Double Gatefold Card.

Last week I mentioned attempting to make a card from one large circle - The ideas started flowing from my one idea and I must say, I ended up with something that is quite different from my original thoughts.

I started with an 8 1/2" circle (cut from a salad plate). Then someone turned the light switch on and I remembered I have a Cricut (sheesh)!
My sample will be using an 8 1/2" scalloped circle cut from DSP.
This is long and involved so run and take a potty break and grab a cuppa.....
Version ONE and TWO to follow........with the hint of VERSION THREE.
Start with one large circle:
You will also need:
Scoring tool, bone folder, ruler, pencil and scissors.

Step One: I started with an 8 1/2" scalloped circle. Regardless of the size you start with, scalloped or not, score a horizontal line 2/3 of the way down your circle, (which will be the height of your card). Mine will be 5 1/2".
 Step Two: Divide your circle into three parts vertically making the middle section slightly less than the sum of the two sides. ie: 2 1/8", 4 and 2 1/8".
 This is where my card took a different turn as to what was originally intended. I had planned on using the image I used, but the idea of a shell popped into my brain.
VERSION ONE:
My Step Three: I scored at 2 1/8" and 6 1/8" on the bottom section below the horizontal score line.

Step Four: Mark the center panel in half along the horizontal score line. Score diagonally from the lowest points of the scallops in only the right and left sections to the center point.

*** Correction: The bottom Mountain Fold is a cut to 1" from center mark on each side leaving 2" for a hinge.

Here is my card once again. As you can see the fanned effect has disclosed the other side of the DSP.

This shows the gatefold open exposing all of the Elisabeth Bell image, "Bonita", which was cut out and pop dotted onto a circle die and sponged with Lavender ink. The sky and a land scene were sponged on with TH Distress Inks.

A tag with a big fluffy brown toule bow was added, along with a sea green taffeta bow and pearl brad.
Materials and Supplies:
May Release "Bonita" by Elisabeth Bell, Cougar paper for copic markers, Copic Markers: R00, E11, R20, E50, E31, E33, E34, V00, BG10, BG43, V00, V04, V15, C1, C4. Sakura Glitter Pen, Vines Die Set and Assorted flowers from Whimsy Buds. From stash: DSP, tag die cut, toule, taffeta ribbon, brad and flatback pearls.
Now back to the original plan....... VERSION TWO
Step Three: Cut along the horizontal score line to the vertical score line from left and right side. The center panel remains scored.


Step Four: Crease fold lines with a bone folder. Remember, innie goes outie - meaning indention of score line faces out.
Step Five: Overlap top left and right flaps.

Step Six: Flip lower section to the front. At this point you can adhere this section to the back making a pocket.

Step Seven: It is your choice to adhere the front gatefold to the back gatefold or close with a bellyband.
I apologize for not decorating this version as time did not permit.
How about VERSION THREE using an 8 1/2" x 8 1/2" piece of DSP. Following the same principal it would become a Double Gatefold Card.
That is it for today - Remember, "stamp up a storm, ink up a wish and send it on to someone to make their day!!"


