
Hi all! Hope you had a good Easter Weekend with family and friends! The weather here in the interior of BC has been incredible, beautiful and warm.
My card today is using a digital stamp called "Gracie" from StampArt Design.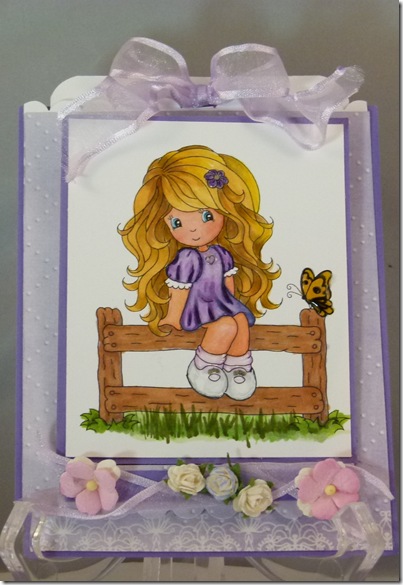 She is just one of the adorable i
 mages
mages
available in the digital category. I've had her colored since I first laid eyes on her...... perfect for a Spring card.
My card is a "Hidden Message" Easel card.
Materials used: "Gracie" from StampArt Designs, exclusively for Whimsy Stamps", Xpress It Blend Cardstock, Memento Tuxedo Black Ink, DP from stash, Flowers - assorted Whimsy Buds, Copic Markers: Skin: R00, E11, R20; Dress: V12, V15, B60, V28; Hair: E30, E50, E53, E23, Grass: YG25, G24, G40; Fence: E13; E53, E33; Glossy Accents (butterfly and flower in hair), Sakura Glitter Pen, Ribbon (wired) from stash. DP and Cardstock from stash.
Hidden Message Tutorial:

(NOTE: For the photography of the tutorial I have changed color of paper and DP)

5. Your DP will look like this. Valley, Mtn, valley fold. (disregard the green underneath).
6. Flip DP over and apply adhesive to the bottom 1/2" of flap.
7. Center the tag behind the width and align and adhere it to the bottom edge of flap.
8. Cut a 1" x 4 1/4" strip of white and scallop punch one edge. Adhere it to the back of the DP to just peek over the edge.

9. With the backside of the DP up - run a line of double sided tape on the edge of the two sides and the bottom. Do not touch the edge of the tag with the tape. Remove backing of tape and centre the piece onto the matted sentiment.
10. Test your tag to see if it moves freely.
11. Adhere your matted image only to the 1 3/4" section above the bottom flap.
12. Apply double sided foam tape to the bottom flap and adhere the DP, snuggling it up to the bottom edge of the matted image.
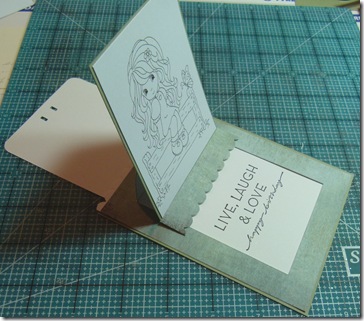
13. Embellish card to your liking.
Remember "Stamp up a storm, ink up a wish - and send it on to someone to brighten their day".
My card today is using a digital stamp called "Gracie" from StampArt Design.
 She is just one of the adorable i
 mages
mages available in the digital category. I've had her colored since I first laid eyes on her...... perfect for a Spring card.
My card is a "Hidden Message" Easel card.
Materials used: "Gracie" from StampArt Designs, exclusively for Whimsy Stamps", Xpress It Blend Cardstock, Memento Tuxedo Black Ink, DP from stash, Flowers - assorted Whimsy Buds, Copic Markers: Skin: R00, E11, R20; Dress: V12, V15, B60, V28; Hair: E30, E50, E53, E23, Grass: YG25, G24, G40; Fence: E13; E53, E33; Glossy Accents (butterfly and flower in hair), Sakura Glitter Pen, Ribbon (wired) from stash. DP and Cardstock from stash.
Hidden Message Tutorial:


- Matted image 3 3/8" x 4 1/4"
- DP 4 1/8 x 5 3/8" and 3 3/8" x 1" (this allows for border punching edge)
- Sentiment piece 3 3/4" x 5 1/2" (white)
- Tag 3 1/4" x 5 1/2" (white)
- Cardstock 4 1/4" x 5 1/2"
- 1" strip of white ( allows for border punching edge)
- Misc. D/S tape, foam tape, ribbon, flowers, corner rounder and scallop punch.
(NOTE: For the photography of the tutorial I have changed color of paper and DP)

- Flip DP to wrong side and mark 5/8" margins on all four sides. Before cutting - mark the top side of the margin with dotted lines _ _ _ _ to indicate a score line.
- Drop down 1 3/4" and mark on each side of inner box. _ _ _ _ to score.
- Measure down another 1 3/4" and mark again _ _ _ _ to score.
- Cut around the other 3 lines.

5. Your DP will look like this. Valley, Mtn, valley fold. (disregard the green underneath).
6. Flip DP over and apply adhesive to the bottom 1/2" of flap.
7. Center the tag behind the width and align and adhere it to the bottom edge of flap.
8. Cut a 1" x 4 1/4" strip of white and scallop punch one edge. Adhere it to the back of the DP to just peek over the edge.

9. With the backside of the DP up - run a line of double sided tape on the edge of the two sides and the bottom. Do not touch the edge of the tag with the tape. Remove backing of tape and centre the piece onto the matted sentiment.
10. Test your tag to see if it moves freely.
11. Adhere your matted image only to the 1 3/4" section above the bottom flap.

12. Apply double sided foam tape to the bottom flap and adhere the DP, snuggling it up to the bottom edge of the matted image.

13. Embellish card to your liking.
Remember "Stamp up a storm, ink up a wish - and send it on to someone to brighten their day".


