Showing posts with label Whimsy Stamps. Show all posts

Tuesday, December 3, 2013

Try It Out Tuesday #37 for Whimsy Stamps

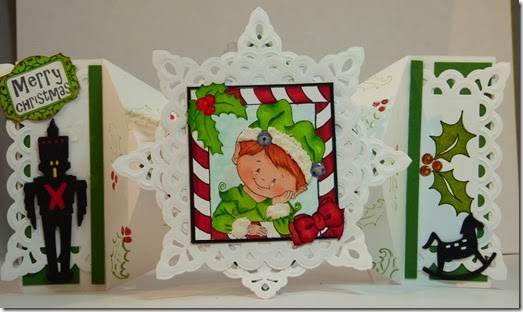
  Hi all for another Try It Out Tuesday.  My card today is featuring Elf P1030177 Frame by Crissie Armstrong for Whimsy Stamps. Cute little fella.  The card itself is a Diamond Fold card with a quick tutorial.P1030179


Materials used:  Elf Frame by Crissie Armstrong for Whimsy Stamps, Holiday Slider Sentiment, Lynx White Copic card, Memento Tuxedo Black ink, Copic Markers:  R00, E00, R20,, R22, R14, YG03, E95, E93, E97, C7, C4, and G85.  Spellbinders Lacey Square die, misc. stamps from stash. Whimsy Shapeology dies Nutcracker and Rocking Horse, White Liquid Applique (hat and sleeves) and Glossy Accents (bells, Holly Berries).
I started with cardstock (white) cut to 11" x 4 1/4".  Finished card (envelope size) is 5 1/2" x 5 1/2".  Regardless of the size or width of cardstock it is easy to fold without a lot of complicated measuring. 
P1030141Step One:  Find the center top and bottom on the longest side of your cardstock. Disregard my dashed lines at each side.


P1030143

Step Two:  Pull the bottom edge up precisely at the bottom center mark and align that edge with the top center mark. Crease well.  Repeat for other side.


P1030157

Step Three:  Unfold and rotate 180 degrees (top is now the bottom) and repeat step two.  Crease well.


P1030170
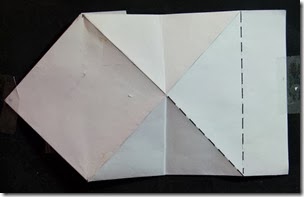
 Step Four:  Unfold.  In pencil, mark the center point between the top and bottom triangle. Line those two marks up and score. This line will dissect the center point of the X.  (Shown with a crease mark)
Step Five:  In pencil mark where the X meets the edge of the paper top and bottom. Line the two marks up and score. Shown by dashed line.
P1030172
 
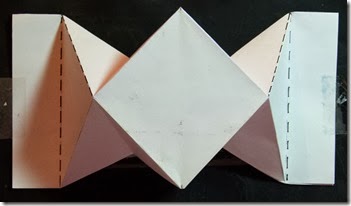
Step Six:  The only vertical folds will be at each end of your cardstock.  This will be a valley fold.  Each side of the center Diamond will be a Mountain, Valley and Mountain fold.
Step Seven: Decorate your card.  eg.  Randomly stamp the sections between the two side rectangles and the diamond;  Adhere DP to each triangular section.  (Measure front diamond - subtract 1/8" and cut a square).  Cut that square diagonally. Additional pieces of cardstock can be added to elongate the side panels.
I chose to use a matted image for the front diamond and used two lacey square die cuts layered atop each other to give me an 8-sided snowflake.  (ok, I know that snowflakes are 6-sided - mine is a mutant snowflake). As you can see the very bottom point adds stability to the card itself.P1030178As you can see the very bottom point adds stability to the card itself.  I cut a lacey square die in half to add to the side panels of the card, then added two die cuts and a sentiment.
Hope my card has inspired you to try a Diamond Fold card yourself. 
Rubber hugs, Whimsy wishes,
madge0902 (1)

Tuesday, November 26, 2013

Try It Out Tuesday # 36 - for Whimsy Stamps

Hi all, another Tuesday and my inspiration today came from a drawn image in my "Smash Book" of ideas.  I don't know where it originally came from but I have a big note to myself to use a MS punch called Cherish. This is a free standing card supported by the side flaps.
I am using an image from the November release of the Little Cottage Cuties Collection called SugarPlum Faery", illustrated by Elisabeth Bell for Whimsy Stamps.  P1030134  
This card looks very sparkly in real life as I used my favorite Sakura Stardust Pen and Shabby White Frantage.  If you haven't tried using Frantage -- it is something to put on your list. 
Materials used:  White Lynx Cardstock, Memento Ink, SugarPlum Faery" stamp, Copic Markers:  Skin: R00, E02, R20, Hair:  E40, E42, E31, YR31, Other: V04, V05, V01, V17, Y06, Y18,YG03, G20. Ranger Distress Inks (Squeezed Lemonade, Dusty Concord), Versamark, Shabby White Frantage, MS Cherish punch, Sakura Stardust Pen,  DP (Basic Grey - Plumeria), Perfect Plum ink and Elegant Eggplant C/S.
I started with 2 sheets of white cardstock cutting each in half at 5 1/2".  a,b,c,d cut in the following lengths.
a)  5 1/2" x 7 1/4"  - Score at 1 1/2" and 5 5/8" - Border punch - this will leave a center section of 4 1/8". 
b)  5 1/2" x 6 1/4" - Score at 1" and 5 1/8" - Border punch - leaving a 4 1/8" center section.
c)  4 1/16" x 8 1/2" - Score at 5 1/2" (This becomes the front flap that holds the image) - Border punch the edge of the largest section.
All edges were sponged with Dusty Concord Distress Ink.
d)  Used for stamped image.  After my image was stamped, I stamped another image onto Post It, masked my image and sponged all around the image with Squeezed Lemonade, then randomly sponged versamark to sprinkle Frantage onto. Heat set the Frantage from the underside and brushed off any excess.  Sponged Perfect Plum around image. The image was cut 1/2" smaller than the inside panel of the card, matted and adhered to the front flap.
a is the back of the card,  c (the shortest section) is adhered P1030137to the center section of a.  b is then adhered only at the center section to a and c.  The flap with the image attached flips down.
P1030136  


I added a matted sentiment over DP and Cardstock.  To add some bling to the sides, I sponged and frantaged strips and adhered them to a thin mat.
I hope my card has inspired you to stamp up a storm and ink up a wish and send it on to someone to make their day.
Rubber hugs and Whimsy wishes,
madge0902 (1)

Tuesday, November 19, 2013

Try It Out Tuesday #35 for Whimsy Stamps

Hi all, and a Happy Tuesday it is!! My "little boy" showed up around 10 pm after a very long drive from the frozen north.  I was so happy to see him! He didn't even tell his Dad, as he didn't want me "fretting" (yep, I'm a fretter) about his drive through nasty weather. Totally a very nice surprise!!
As much as I dislike snow, it is inevitable that it will happen.  I've decided to  create my favorite type of snow --  ARTIFICIAL!!  I used a sweet little image from the Crissie Armstrong collection for Whimsy Stamps, called Penguin Happy Mail, an October release.  Cute as can be!
P1030129 copy 
Materials used:  Penguin Happy Mail Lynx White Copic paper, Memento Tuxedo Black ink, Copic Markers:  YR23, YR24, R24, R29, B23, B28, B79, B60, Y28.  Ranger Distress inks:  Stormy Sky and Barn Door.  Sakura Stardust Pen, Glossy Accents, Art Deco Snow Writer, Snowflake punch, misc. Snowflake stamps, Alphabet Stamp and 1/4"  and 1" circle punch.  Circle Scallop die. Red, White and Navy Cardstock.
After coloring my image I die cut it into a scalloped circle, sponging with Stormy Sky while still in the die. The image was then popped onto a piece of white cardstock (randomly stamped with snowflake stamps, using Stormy Sky) and matted with Red cardstock..
I decided against chopping the width  of the navy card base and added a colorful border of a snowflake background layered with 1" circle punches and additional snowflakes to finish off a 5 1/2" square card.  Punched snowflakes were all sponged with Ranger Stormy Sky.
P1030130 copyIn my collection of stamps, I found an alphabet stamp (another rescued stamp), stamped it with (Ranger) Barn Door and used a 1/4" circle punch to pop each letter in the center of the snowflakes.  "Let It Snow"  (not until December 24th, I say under my breath)   
Three products that I use often are my copic markers, Sakura Stardust Pen and Glossy Accents.  Layering the trio gives the effect of a twinkling Christmas Tree Light.P1030132 copy


OH!  If you look closely, you will see little outlined circles......  they are made by stamping off the tip of a pencil eraser inked with (Ranger) Stormy Sky.  The entire image was outlined in these little circles.
I hope my card gives you some inspiration to stamp up a storm, ink up a wish and send it on to someone to brighten their day.


Rubber hugs, Whimsy wishes,
madge0902 (1) 

Tuesday, October 22, 2013

Try It Out Tuesday for Whimsy Stamps -- "Holly"

image
Hi all, is it getting nippy in your little corner of the world? We’ve had sunny days here in the Okanagan Valley, but the warmth sure has vanished. We’ve been busy putting the 5th Wheel, boat, pool and yard to bed for the winter……. So now it’s on to preparations for that Big Day that comes around every December. I’m starting to think ahead, and as usual my brain is going nutz thinking of all the things that have to be accomplished.clip_image002
Have you a stamp that you absolutely adore?? I have a couple of hundred! One absolute favorite Christmas stamp is a "Holly" a Wee Stamp in the Whimsy Store . She is soooooo precious.
This is a “Nugget Box” made to be filled with 9 Hershey Nuggets or whatever you’d like. P1030120image
Materials: “Holly”, Copic White Cardstock, Tuxedo Black Memento ink, Copic Markers: R00, E02, R20, E30, E50, E53. E35, E27, W1, W3, R37, R39, R27, YG63, YG67, Y18. Ice White Viva Décor pen, Sakura Stardust pen, Glossy Accents, Whimsy buds, Brads, Rick Rack, Oval and Scalloped Oval dies, Fern punch (MS),  Red, Green cardstock, Metallic Gold cardstock, and DP from Stash.
Dimensions of the card: 6 1/4" x 5 1/4".  Card Base:  11" x 6 3/8" - score at 5 1/4" and 5 7/8", leaving 5/8" to wrap around box.
Inside of box:  2 pcs white c/s 6" x 8" and 2pcs white c/s 5" x 8", scraps of white to die cut Lace Doily Corner I, Scraps of Red Cardstock cut to 1/4". 
Here is a tutorial for a Book Card Nugget Box, I hope mine has given you some inspiration to Try It Out.
madge0902 (1)


Monday, July 29, 2013

Try It Out Tuesday - #23

Hi all, Madge here for another Tuesday - trying out a Kenny K image called "Tex", a new release for July.  I am way ahead of schedule with this one as Denise and some of the DT are baking basking in the sunshine and having a blast at CHA in Las Vegas.  Denise graciously invited me along, but we have a Wedding.......  and if I missed it, my name would be MUDge.
P1020899 copy
Meet "Tex", a July Release from Kenny K.  I have a thing about blue eyes, so I tried to give him those "Paul Newman" eyes......dating myself, aren't I??!!  Can't say I've seen many cowboys walking around without shirts on, but if they are out there -- YEE HA!!
On the inside of the card I wrote:
 "Herd" you like six-packs. 
This one
  • has no calories --
  • is easy on the eyes --
  • is really easy to mail.
There are two gals that come to mind on the Whimsy DT that do the Kenny K images to absolute perfection, Patricia Garcia and LaJenette Garcia.  I don't know if they are related, but these two gals really do justice to the provocative images of Kenny K. 
Materials:  
"Tex" from KennyK's Cool Dude series, for Whimsy Stamps, Cowboy Die Set (Whimsy Shapeology), Copic paper, Memento Tuxedo Black ink, Copic Markers E01, E11, E13, E70, E71, R20, E35, E39, E27, B81, B85, C01, C4, C7.  TH Black Soot, Mahogany, and Antique Linen Distress Inks, Glossy Accents (boots and horseshoes), Inca Gold rub on paste, Card stock, DP and button from stash.
*NEW Cowboy Die Set*NEW Tex
Next week (Aug. 6th) I'm going to step into my box again, but with Scrapbook Pages......  and maybe a Wedding Photo or two...... lol  See you then!
Until next week,  "Stamp up a storm, ink up a wish, and send it on to brighten someone's day".
madge0902 (1)


Monday, April 29, 2013

Whimsy "Try it Tuesday" #11

Did you miss last Tuesday's Newsletter?  Totally my fault.  We changed location and our cable / wi-fi was not hooked up to send.  It took a couple of days to get back on track - but thankfully tech support managed to fix the situation.  Never-the-less, this should have pre-posted from my home computer - and it didn't - My old brain is not clever enough to try to second guess an electronic device. 
I have a short, but sweet, post for todays "Try It Tuesday" using a sweet digital image with a bonus Sentiment set from StampArt Design called Ari & Toby. Kathryne has captured these sweet little children at their cutest.
P1020534 copy
Materials used:  Toby & Ari, by StampArt Design, Cougar White (copic paper), Memento Tuxedo Black ink, Mustard Seed (Tim Holtz distress ink), Glossy Accents (puddle and butterfly), Copic Markers:  R00, E11, R20, E30, E34, E35, R22, R23, R24, R29; BG10, BG13, BG31, C4, C7
From Stash:  Gathered Lace, Friends button, Flowers,Butterfly punch,  and leaf punch.
The image was colored and easily cut out to be popped on top of the DP with foam dots for dimension. The sentiment was cut in a circle and sliced to fit under a slit in the rainbow DP (Websters Pages). Glossy Accents were added to the puddle, Butterfly and bow on the umbrella.
Until next time - "Stamp up a Storm, ink up a wish, and send it on to someone to make their day."
Rubber hugz, Whimsy wishes,
madge0902 (1)

Tuesday, April 16, 2013

Try It Tuesday #10 - Spring Bringer

Hi all for another Whimsy Try It Out Tuesday.  My heart goes out to those who lost loved ones or were injured in yesterday's tragic events in Boston.  It is sad that there are people in this world that will harm innocent people for some unknown reasoning in their sick minds.

On a very much lighter note.  I have a little card today to bring some Spring happiness into your life. P1020527 copy Since we are all so ready for Spring to happen for real, I've created a card to  (shove, kick, boot)....ummmm, help, it along using Spring Bringer, a Wee Stamp designed by Sylvia Zet for Whimsy Stamps. Isn't she adorable??!!

Supplies used:   Spring Bringer; Xpress It Blending Card, Memento Tuxedo Black ink, Designer Papers by Michele R Designs for Whimsy Stamps, Copic Markers:  Skin: R00, E11, R20   Hair:  E30, E34, E35  Wings:  RV52, RV0000  Clothing:  RV0000, RV10, RV63, RV66, RV69  G24,  Flowers:  Y17, RV63, RV66,  Sakura Glitter Pen, Glossy Accents (wings), SU small and large Butterfly punch, SU Colored card stock, EK Success border punch, Sewing Machine (huh!!??) and flowers from stash.

Inside my card,  I've added a special surprise - Butterflies.P1020533 P1020529 


LOTS of Twirling Butterflies.
The tutorial for the Twirling effect can be found at SCS where there is a Video which can give you the visual effect.  My card finished is 5 1/2" x 5 1/2". The bulk of the inside will probably require a box envelope to send and extra postage.  Did I have fun playing??!!  Sure did, it was fun to construct - and that's why I enjoy card making - the challenge and seeing the final results. Giggles can often be heard coming from my Craft Room....... which send my dogs into a tilted head pose.....  (ok, their mommy is a bit strange).

Additional Supplies used for inside:  Designer Papers by Michele R Designs, SU Butterfly punches, unknown stamp, Skewer (painted white and cut to size), string and rhinestones......Oh, almost forgot -- paper beads.

I really have to add that I absolutely love the Designer Papers by Michele R Designs, which until recently were only available to me through digital format.  Our LSS started to carry them and they are absolutely gorgeous and are a  6"x 6" size - perfect for cards.  She has added glossy elements to the paper that are stunning.  I almost hated to cut into them.  Absolutely Beautiful!!

I will be entering this card into the following challenges:
Whimsy Inspirations - Pretty in Pink
Bearly Mine - Spring flowers
Totally Gorjuss # 179 - Spring Shades

Until next time - Stamp up a Storm, ink up a wish, and send it on to someone to make their day.
Rubber hugz, Whimsy wishes,madge0902 (1)

Tuesday, April 2, 2013

Whimsy "Try It Tuesday" #8

Hi all!  Hope you had a good Easter Weekend with family and friends! The weather here in the interior of BC has been incredible, beautiful and warm.
My card today is using a digital stamp called "Gracie" from StampArt Design.P1020469 She is just one of the adorable iP1020449mages


available in the digital category.  I've had her colored since I first laid eyes on her...... perfect for a Spring card.
   My card is a "Hidden Message" Easel card.   
Materials used:  "Gracie" from StampArt Designs, exclusively for Whimsy Stamps", Xpress It Blend Cardstock, Memento Tuxedo Black Ink, DP from stash, Flowers - assorted Whimsy Buds, Copic Markers:  Skin: R00, E11, R20;  Dress: V12, V15, B60, V28;  Hair:  E30, E50, E53, E23, Grass:  YG25, G24, G40; Fence:  E13; E53, E33; Glossy Accents (butterfly and flower in hair), Sakura Glitter Pen, Ribbon (wired) from stash. DP and Cardstock from stash.
Hidden Message Tutorial: 

  • Matted image 3 3/8" x 4 1/4"
  • DP 4 1/8 x 5 3/8"   and 3 3/8" x 1"  (this allows for border punching edge)
  • Sentiment piece 3 3/4" x 5 1/2"  (white)
  • Tag  3 1/4" x 5 1/2"   (white)
  • Cardstock  4 1/4" x 5 1/2"
  • 1" strip of white ( allows for border punching edge)
  • Misc.  D/S tape, foam tape, ribbon, flowers, corner rounder and scallop punch. 


(NOTE:  For the photography of the tutorial I have changed color of paper and DP)


P1020479
  1. Flip DP to wrong side and mark 5/8" margins on all four sides.   Before cutting - mark the top side of the margin with dotted lines  _ _ _ _ to indicate a score line.
  2. Drop down 1 3/4" and mark on each side of inner box.  _ _ _ _ to score.
  3. Measure down another 1 3/4" and mark again _ _ _ _ to score.
  4. Cut around the other 3 lines.P1020482

5. Your DP will look like this.  Valley, Mtn, valley fold.  (disregard the green underneath).
6. Flip DP over and apply adhesive to the bottom 1/2" of flap.
7. Center the tag behind the width and align and adhere it to the bottom edge of flap.
8. Cut a 1" x 4 1/4" strip of white and scallop punch one edge.  Adhere it to the back of the DP to just peek over the edge.
P1020497
9. With the backside of the DP up - run a line of double sided tape on the edge of the two sides and the bottom.  Do not touch the edge of the tag with the tape. Remove backing of tape and centre the piece onto the matted sentiment.
10. Test your tag to see if it moves freely.
11. Adhere your matted image only to the 1 3/4" section above the bottom flap.   P1020492
12.  Apply double sided foam tape to the bottom flap and adhere the DP, snuggling it up to the bottom edge of the matted image.
P1020500
13.  Embellish card to your liking.
Remember "Stamp up a storm, ink up a wish - and send it on to someone to brighten their day".

Tuesday, March 5, 2013

Whimsy "Try It Tuesday #4" - Side-by-Side Easel Tutorial

Hi all!  Welcome to "Try It Tuesday" #4.  Glad you could stop by!
Last week I showed a side-by-side Easel card using P1020236 copyWhimsy's Cottage Cuties "Spring Pick" by Elisabeth Bell.  Today I have a tutorial for the Side-by-side Easel card.  I really have to confess that when I really love an image - you can bet your bottom dollar that I'm going to use it more than once! Today is no exception!  I was blessed to have this image in among the Whimsy DT kit.  Wonderful!

This is very long, so if you have to go potty or grab a cuppa .......  do it now.  lol
Side-by-side Easel Card Tutorial:
Supplies:  Base cardstock  11" x 5",  Coordinating Border / Corner punch combo, Scoring tool, Cardstock for mats, DP for mats.  Also an image, colors you will use to color the image, coordinating cardstock (8 1/2" x 11") and Designer paper(s),  and a die cut or shape. (I will go into detail on other supplies I used at the end of this tutorial).
Step One:   Cut cardstock to measure 11" x 5", then select a border / corner punch combination that you would like to use.  Start with a corner punch working to the next corner - you will be able to see that your paper may need trimming to get a smooth transition.
P1020153-001For my sample, I used Martha Stewart's "Vintage Floral" border and corner.  I trimmed about 3/16" from my 11" length - but the 5" width was perfect.


Step Two:  a) Score your border punched piece in half.  b) Score halfway between your center line and the inside of your border.  c) Score halfway between a & b.
0153 copy

b - Valley fold
c - Mountain fold
a - Valley fold

Step Three:  Crease your score lines well with a bone folder.  P1020162


Step Four: proceed to "wallpaper" your base card.
Tip for getting those mats straight and looking great...
P1020169 copy

Open the front flap leaving the mountain and back valley fold holding your mat in place. Push your mat into the fold.  (At this point it can be wider and longer).  Hold the mat "sandwich" with your thumb and index finger and flip it over. 
P1020173 copy
With a pencil, mark between spaces of border punch.P1020183 copy 


If your width is  too wide mark it also. 
Remove the mat and trim.0186


Easie, peasie and beautiful!!
Repeat the process for the front and back of the front flap.  P1020193


  Step Five:  The paper that I originally chose for "wallpaper" looked insipid next to my image.  Tim to the rescue!!  (He's such a sweetie!)  Tim Holtz Mustard Seed Distress Ink, a sponge......... and the magic happened!!  Now I like it!P1020218 copy
P1020219 copy


Step Six:  After your wallpapering is complete you are in the home stretch. When adhering your image only apply adhesive to the left side, leaving the right unattached.  Fold your card together and adhere your image and embellishments.
Here is my card in the open easel position.  I love this look for displaying - it sits like an open book along with stability to hold anything you may want to put on your creation. 
P1020225 copy

 Here is my card in the closed (ready for mailing) position:P1020236 copy


Supplies added
Stamps:  Spring Pick, Sentiments from,Time Flies.
Dies: Vines Die Set, Circle and Scalloped Circle, MS border / corner punch.
Flowers - Whimsy Buds Ribbon & Buttons from stash  Misc:  Glossy Accents (headband flower), Tim Holtz Mustard Seed (DP), Stormy Sky (sky of image) and Spiced Marmalade (Flowers and Border), Flat back pearls, Xpress it Blending Card, Memento Tuxedo Black Ink, Copic Markers.
Hope you are seeing spring wherever you may be.  Our snow has almost disappeared (knock on wood).  Still time for some more - but it won't last!!
      I'm entering this card into the following challenges:
Sugar Creek Hollow - Lovely Lace
Divas by Design - Buttons and Bows
Krafts for Eternity - Tic Tac Toe - Yellow, spots, layers

              
Remember, "Stamp up a storm, ink up a wish and send it on to someone to brighten their day".
Rubber hugz, Whimsy wishes,
madge0902 (1)