Wednesday, January 26, 2011

LOVES ME TILDA

P1110785 copy
In keeping with the January “LOVE” theme at One Crazy Stamper, I chose the Magnolia Stamp called “Loves Me Tilda, available at One Crazy Stamper  now, for a price that can’t be beat.
  
The following materials were used:
Copics:  Hair:  YR21; Y18; Y28 
Skin:  R00; E01; R20;
Shirt:  RV91; RV95; R10  Pants and Socks:  BG93; BG96; YG91 
Bench:  E 70; E74; E53 
Shoes: C0 C04;
Flower: Y18; YR65
Spellbinders:  Label Fourteen
Cuttlebug Embossing Folders
from Stash:  DP, Ribbon,  Cardstock
Note:  After I had stamped the image I realized I had forgotten to stamp anything for her to sit on, so I used my X-acto knife to cut her legs free, and slipped the reconstructed stool under her. Whew! 
I’m entering this card into the Mojo Monday Sketch 175
One Crazy Stamper “Love” challenge.

~ Rubber hugs, Inky wishes ~siggyhaycock

Wednesday, January 19, 2011

Fanciful Flourishes

My order from One Crazy Stamper came today – and in it, the Fanciful Flourishes Set.  When I looked at the stamp set, the technique that came to mind was one that we learned from an SU Stamp Club and created by our uber-talented Cheryl. She is amazing!P1110762 copy
Please forgive my photography for this one – the sponging looks so white, but in real life it is quite vibrant.  This one seemed to be the least washed out.
My card is 5” x 5” using SU cardstock:  Navy, Black, and Whisper White. Another layer was  blue glimmer paper from an unknown source.  I stamped the White with elements from  Fanciful Flourishes in Black Stazon .
Note:   (remember when using Stazon with acrylic stamps – clean your stamps right away with a good stamp cleaner that will condition your stamps). 
I then sponged the squares with Faded Jeans and Antique Linen Distress Inks.  The heart was stamped in Broken China and covered with Glossy Accents, sprinkling clear glitter on it while still wet.  I stamped a script stamp onto the white sponged pieces with Pumice Stone and layered.  The “With Love” sentiment, from the set,  was fussy cut and sponged to give dimension.
I added 3 clear Dew Drops, which were coloured with  Copic B39.
Hope you’ll give this technique a try – it has a very vintage dimensional look.  siggyhaycock
~ Rubber hugs, Inky wishes ~

Wednesday, January 12, 2011

Love Never Melts

Meet “Siku and Shiya” two little Eskimo children  (I’m assuming that they are Eskimo, forgive me if that is politically incorrect). When I first saw this stamp at One Crazy Stamper, from Stampavie, I knew exactly what I wanted to do to fit perfectly into the “LOVE” theme for Jan. at One Crazy Stamper.P1110758 copy
My card measures 5 1/2” x 4 1/8”.  I used copics R00, R20, E21 R24, R28, B00, B66 and B69.  Also used C0 and C4 for shading and Tim Holtz distress inks (Broken China and Tattered Rose) for sponging around the heart.
Stickles, ribbon, Love stickers, and snowflakes from stash.
 
P1110757 copyThe surprise is the way the card opens – it “breaks open”.  The tutorial for a Break-a-way Card can be found on my blog.

Tip: I matted my decorated cardfront onto Not Quite Navy (SU), cut another identical mat and used repositionable tape to adhere both mats together with the card front facing up.  I then cut the two exactly in half vertically  to get the four identically sized pieces for the break-a-way card.
 
Follow the link to enter the challenge at One Crazy Stamper for the chance to win a fantastic prize. siggyhaycock
~ rubber hugs, inky wishes ~

Friday, January 7, 2011

Whole Latte Love

P1110744   Anyone who knows me accepts my crafting addictions…………..but may not know that I do have another non-crafting addiction.   Chai Tea Latte……..  I buy the Chai Tea by the case, milk by the gallon and treat myself to one-a-day “Grande, no fat, decaf, Chai Tea Latte with a sprinkle of cinnamon sugar on top………. YUMMMMMEEEEE!  P1110747 copy
My card this week features a stamp from YOUR NEXT STAMP and to coincide with the February challenge at ONE CRAZY STAMPER’S being “LOVE” – Well, here is my “Whole Latte Love”.
 mmmmmmmm, I can almost taste the wonderful hot spicy milk throgh the spicy froth on top….
P1110751The cup from Your Last Stamp, was shaded using Copics:  E50; E51; E53, the hearts using R35 and R39, applying Glossy Accents to them and sprinkling with ultra fine glitter.
I created the froth using White Opal Liquid Pearls, waited for it to dry, then shaded it with E70 and E71 to achieve the look of Chai Tea froth.  The same copics were used to simulate the table to ground the cup.
Remember to stop by the One Crazy Stamper challenge blog and enter your “Love” card for a chance of a $25 Gift Certificate for the One Crazy Stamper store!!
Until next time  ~ rubber hugz, inky wishes ~siggyhaycock

Tuesday, December 28, 2010

Trevor is hitting the slopes

Can you believe that 2011 is almost here??!!  This will be my very last post for 2010.  I hope you all had a wonderful holiday enjoying time with family and friends.

You may even be on a Ski vacation like our friend  Ski Bunny Trevor, who is on the slopes sporting his new Christmas attire.  Santa was very good to him and his Grandma knit him a cozy sweater with a matching scarf to keep him warm.  This stamp is just the cutest and quickest to bring to life.  I've had him coloured for quite a while just itchin' to put him to paper.

I used the following Copics to colour my image:
Skin:  R00; R20  Sweater:  R14; R24; R35; R39  Pants & Hat:  B000; B01; B06; BG45; BG72
Hair:  Y23; Y26; Y28; YR24   Boots, Gloves, Shading, Scarf, Skis:  B39; B37; BG72; C4; C7

I had some trees colored and cut out from a previous project and used them to create a winter wonderland scene by applying white glue and sprinkling Art Institute - Frost Ultrafine Glitter
to give the snow some sparkle.

Instead of using my Spellbinders "Labels Eight"  to cut out the image, I used a trimmed negative for a frame, matted it with red cardstock and punched an MS Border Punch down the right hand side.  This was all mounted on paper from 6" x 6" double-sided paperpad from Webster's "Santa/Sweet Season" and then put on a black card base.  Another tree and two snowflakes joined together with a Rhinestone were popped onto the frame with foam dimensionals

Hope you enjoyed my little card as much as I had fun making it.

~ rubber hugs, inky wishes ~
Madge

Wednesday, December 22, 2010

Popcorn Bear is ahead of the Game

Are you almost ready??!!  because....................  "Santa Clause is coming to town".........

Popcorn the Bear is jumping ahead a little to wish you all a Happy New Year!  I love this little image of Crafter's Companion Golfer Popcorn.  OCS has so many of the "Popcorn" sets in stock, you’re sure to find one to suit a card for anyone.Popcorn Bear718 copy
I found that he was so easy to color and hardly used any color at all, keeping him light and sunny looking.  The Happy New Year letters were punched and mounted on a sign that was sized to fit between his arms.  (I cut off the golf clubs and poked two holes in his hands to insert the twine to hold the sign.  Glossy Accents was used to stabilize the letters.
Copics:  E50, E51, E53, E9, R20, R89
Spellbinders:  Labels Eleven
Misc: (snow)  Frost Ultrafine glitter, ribbon and DP from stash.

I want to wish everyone of you who celebrate Christmas  a very “Merry Christmas” to you and yours . May the holidays give you time to spend with family and friends.

Til next time
                                ~ Rubber hugz, inky wishes ~siggyhaycock

Wednesday, December 15, 2010

Stampavie – Penny Johnson - “I Wish”

Welcome to Wonderful Wednesday!  

When I saw this image in Lora's store, I just had to have it!  It is so sweet!  I had so much fun bringing it to life with my Copics.
The end result took very little coloring as the image speaks for itself. I also used some of the 6 x 6 Webster’s pages. These cardstock weight papers are so rich and beautiful! The 6 x 6 pads are scaled down versions of the  12 x 12, which make them ideal for cards.  They are my absolute favorite papers!   
Card Recipe:P1110713 copy
Copics:  Bows, and Stockings:  R24; R20; R29; R39, Skin:  R00; E02; R20,  Dress:  RV20; C1,  Hair:  E11; E13; Y18, Mantle:  E33; E11; E13; C1, Shading:  C1; E11
Spellbinders:  Beaded Ovals and Scalloped Rectangles
Misc:   Stickles, Pearls**, Memento Black Tuxedo Ink, Cuttlebug Embossing folder, Glossy Accents, Oval Punch, and Frost - Sheer Shimmer Mist.
P1110714 copy** TIP:  In a pinch, if you don’t happen to have the right shade of pearls, color them with copic markers.

This image reminds me so much of our daughter, when she was little.  She always had a teddy in her arms and such a sweet little smile. P1110716 copy


Remember, Stamp up a storm, ink up a Wish and send it on to someone to brighten their day.
~ rubber hugs & inky wishes ~

siggyhaycock

Monday, December 6, 2010

ONE CRAZY STAMPER Launch Week

Hi to all my fellow Blogsters!!  Well today is a big day for ONE CRAZY STAMPER, as it is the Launch of the Design Team Blog, which I am very proud to be a member.  We have all been waiting on pins and needles for this day.  If you haven’t been to One Crazy Stamper’s online store you have been missing out BIG TIME.  The prices are absolutely awesome, with lots of sales going on, her copic prices are a screaming deal – Check it out at OneCrazyStamper.com.

OK, now I’m really nervous about my first post to a Design Team Blog – I’ve been puttering with my own blog for over a year, but this is serious stuff – and I’m in a league of absolutely talented gals.  I feel like a tadpole in a very big pond. 
The theme this month is of course, Winter / Christmas.  I just love the rich colours of Christmas.  I made a Tri-Shutter card, using Chic Shopping, available at One Crazy Stamper.   I’m always kidded by my husband about not being able to make a normal 4 1/4” x 5 1/2” card …….  I love to construct…….

Chic ShoppingOpen-Chic-ShoppingCARD RECIPE:
Stamp:  Chic Shopping from Stampavie; Ink:  Memento Tuxedo Black  Copics:  Coat, Purse, Scarf:  R22; R25; R29; R39;  Pants & Bag, Scarf:  E11; E21; E23; Skin:  R00; E01; R20  Hair:  E29, E25; E21. Die Cuts:  Long Classic Scalloped and Plain Rectangles .  Other items: MS Border Punch, Webster Pages DP, charms and ribbon from stash.
Drop over to One Crazy Stamper and take a peek at the samples the Design Team have added to the Christmas / Winter theme.  Enter your own card, to win a $25 Gift Certificate!!   With OneCrazyStamper's  already fantastic prices, $25. can go a very long way! 

Saturday, December 4, 2010

Mojo Monday Challenge #167

For Mojo Monday Challenge #167, I decided  to make Tilda With a Hanging Star into an Ornament to fit  the challenge.
She is such a sweet little Tilda – aren’t they all??!!  I would have posted this much sooner, but my camera was having issues – actually, the “user” was having issues.  I love my camera.  DH has a DSLR that requires a u-haul to carry all the equipment, and mine – well it is an “almost” DSLR that I carry in a small bag.  My other camera that I have with me all the time – well, it is small and fits in my purse quite nicely. 

Here is a picture of the Mojo Sketch.  
Mojo167SketchP1110673
And here is my creation.  I think “Tilda With a Hanging Star is just the sweetest……….. 

This is the first time I have had a pleasing results experimenting with the copic R’s.
R22; R24; R29; R39.

I cut Tilda out and popped her onto a circle with “Dap”, (the acrylic bathtub grouting compound).

I had forgotten all about the effects of giving dimension, and is easy to apply to those tiny little pieces you want raised.  I have thumbs that hurt most of the time, so I paid a little more and got the trigger pump.  Really easy to use and it lasts forever.  I don’t think it is acid free, so wouldn’t recommend it for scrapbooking and it does take a while to harden
.
P1110696Here is a side view of my card, I used some navy snowflake DSP on the inside and punched out some large snowflakes, then popping it onto some white to make the snowflakes pop.

I will write on the navy with a white gel pen and add a computer generated “newsletter”. 

Hope you enjoyed looking at my creation.  Thank you to all who take the time to leave comments, I love to read them, it makes my day.

Monday, November 15, 2010

Break-a-way card Tutorial

Here little Tilda is -- sitting proudly and on display!!


Hi there stampers, I’m going to share a tutorial on how to construct a “Break-a-way card”. This is my very first tutorial, so I hope you can follow along comfortably.  If the pictures appear too small or too dark, click on the image and it will double in size.


Materials:
4 – 4 ½” x 2 ¾” cardstock (SU Cherry Cobbler)
1 - 5” x 3 ¼” cardstock (SU Cherry Cobbler)
1 - 5 ¼” x 2” cardstock (SU Cherry Cobbler)
4 – 1” circles ( I used flowers) punched from C/S
2 – 2 1/4” x 3 ¾” Designer paper (Bo Bunny)
1 - 4 ¾” x 3” Designer Paper (Bo Bunny)


P1110639


P1110638
Step 1


Other Materials: 
SU Word Window Punch
SU Up Corner Punch
1” Flower Punch ( 1” Circle punch would work)
SU Dimensionals
3-D foam tape
Glue dots (no larger than your punched circles or flowers).
1  – matted image of your choice (approximately 2” x 3”)
 
Step 1: Cut all pieces of Cardstock and Designer Paper. Punch 4 - 1” circles (I used 1” flower punch)

Step 2: If desired, at this point you can punch the corners, stamp and distress your Designer Paper pieces.
P1110644
Step 2
I used Tim Holtz (Brushed Corduroy) Distress ink (available here at OneCrazyStamper) here after I punched the corners. The Snow Bracket stamp is a Stampendous stamp also available at OneCrazyStamper.

Step 3: Attach your Designer paper to the corresponding pieces of cardstock. Set aside.
P1110641
Step 4
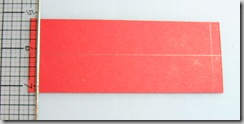
Step 4: Take the 5 ¼” x 2” piece of cardstock and lightly draw a pencil line ¼” from each end and at the 1” mark down the center.
P1110648
Step 5


P1000386
Step 6

Step 5: Line the Word Window punch up with the ¼” mark, centered with the pencil line in the middle. Punch a slot at each end.

Step 6: Place a dimensional in the center of 2 of the 4 circles, or flowers ,you have punched.
P1000398
Step 7


Step 7: Position each of the flowers behind the horizontal slots you punched, lining them up so the dimensional fits through the slot. Peel off the backing and top with the other two – sandwiching the dimensional. Check to make sure it will slide smoothly in the slot.

P1000399
Step 8


Step 8: Put dimensional at each corner and at the center, top and bottom.


P1000401
Step 9
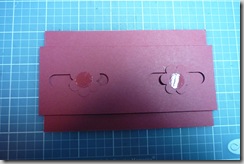
Step 9: Place the matted sentiment face down (base) on the cutting mat, using the grid to align your center points on all sides. A small piece of tape or some repositionable tape will hold it in place.)
P1000402
Step 10


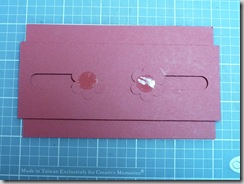
Step 10: Peel the backs from the dimensionals and center the piece on top of the base.
Press to adhere.
P1000403
Step 11
Step 11: Make sure the circles (flowers) are pushed to the end of the slots on the inside. Place a large glue dot onto each circle (flower).

Step 12: Using repositionable tape to keep it in place again, line up the two back pieces (4 ¼” x 2 ¾”) for the card (no Designer paper) onto the mat. Press the glue dots to adhere.


Here is how it will look when you flip it over.


P1000391
Step 12 & 13


Step 13: Cut 4 strips of 3D foam tape to 2 ½”. Place alongside the Top and bottom of the card. Snug them up to the sentiment base. Too tight will prevent the slider from working smoothly. Test before you proceed to the next step.
P1000392
Step 14

Step 14: Peel the back off the 3D foam tape. Carefully place the two matted designer papers on top, lining them up with the sides of the pieces at the back. Press down to adhere.

P1000393
Step 15


Step 15: Test the sliding mechanism of the card and embellish as desired.


Because I like the recipient to be able to display my cards, I cut two pieces of cardstock 2” x 2”, scored one edge at ¼” and applied adhesive to the 1/4”. I then adhered the pieces on the back, flush with the bottom of the card on each side.


Rubber hugz, inky wishes, Cricut chirps and Cuttlebug squishes,

Here little Tilda is -- sitting proudly and on display!!

Hope you enjoyed my tutorial – if there are any questions, please feel free to email me at madge@shaw.ca .

Monday, November 8, 2010

Shake, Rattle and Roll Tilda

 As soon as I saw the challenge of shaker cards, hosted this month by the uber-talented Barb Hardeman on the  Magnolia-licioushighlights challenge blog,  I thought of Tilda with Autumn Leaves rolling in the leaves and having a giggling good time.   Then the idea to make her roll and move came into play with a spinner card with Tilda.  I had so much fun coloring this little Tilda - just the look on her face is enough to make me giggle. Diana at Magnolia-licious has her in stock only a mouse click away.

I used a discontinued color of SU to make the background (Marigold Morning), punched the borders using EK Success English Ivy border punch and distressed the edges using Tim Holtz Aged Mahogany.  The Ribbon is from my stash and is absolutely gorgeous because the leaves are actually outlined in gold, the wired edge of the ribbon is copper. I cut some of the leaves out to embellish the paper.  The shaker box is filled with punched tiny  leaves that I colored and distressed with Distress Inks.

I've had this card made for about a week, but my PC was in ICU and my Laptop has an issue with blogger for some reason. So, it has been sitting on my desk shaking to get out of the camera....lol

I'm really pleased with the outcome of the spinner / shaker card. It is a little larger (5 1/2" x 6"), but I will make a custom envelope for her and send her on her way.  I will post a picture of the inside later as we have an appointment in a few minutes.......see you then.

Remember,  Stamp up a Storm - Ink up a Wish, and send it on to make someone's day!

rubber hugz, inky wishes, Cricut chirps and Cuttlebug squishes,
Madge
aka:  maddie6833