Tuesday, July 9, 2013

Try It Out Tuesday #21

Hi all, Madge here for another project created with a new June Release from Whimsy Stamps using "Special Friends" by Chrissie Armstrong.P1020891 copy

I absolutely adore the look on this little sweetheart's face. You can feel the adoration she has for her special friend!

It seems that I stamped this image onto some cardstock that is certainly not copic friendly. I have tossed them into the "G" can, but did not have the time to start from scratch with this one.

Materials used:  "Special Friends, Memento Tuxedo Black ink, copic markers:  Skin: R00, E11, E13, R20.  Hair: E11, E13, E35, E39.  Clothing: B91, B93, B95, B97, YG05, YG25, YG01. Horse: E31, E33, E34.  Shading: W0, W1, C0  Flowers: YR20, YR02, R22, G20, G24, G94.  Embellishments:  adhesive Lace Tape and Ribbon from the embellishment section at Whimsy Stamps, tied with cotton thread and that cute little button!!  Go check them out!!  Denise has added some goodies in there that I haven't seen before!!  Now is the time to stock up while they are still available.  Purple Washi tape!!!!  I've been searching high and low for some.......Denise has it in the store!!! 

The cloud background was sponged using torn paper, the edges of the stickers were distressed to add some depth, and the floral corner of the DP was fussy cut (Bo Bunny) to slip the corner of my image behind.

Until next time, "Stamp up a storm, Ink up a wish and send it on to brighten someone's day.

Rubber hugs, Whimsy Wishes,

Monday, July 1, 2013

Sun, Moon and Stars–Try It Out Tuesday

Hi all, for another TIOT.  It is July 2nd and we enjoyed a beautiful hot and sunny weekend of sea air, sun, family and fun. 

Today I’ve used a Rainbow Echo Design Stamp set, called Sun, Moon, Stars, a fun set packed with 4 images and 6 sentiments.  P1020875I’ve done a simple card, which looks really cool in real life, but because of the glitter doesn’t photograph very well.  The stars were embossed with Iridescent Ice and the moon was stamped onto yellow card stock and embossed with the same. All were cut out and arranged around the sentiment, “Shoot for the moon….. Even if you miss, you’ll land amongst the stars.” 

Materials used:  Sun, Moon, Stars, White, black yellow and navy card stock. Memento Tuxedo Black ink, Versamark ink, Iridescent Ice Embossing Powder, Spellbinders Radiant Rectangles and an SU die. 

Thanks for dropping by, we’ll see you next week.

rubber hugs, whimsy wishes,

Tuesday, June 25, 2013

Try It Out Tuesday - Not Fat, Fluffy!

Hi all for another Try It Out Tuesday.  Madge here, "Just Chicken In". A friend's hubby has not been feeling well for a while.......  when I saw this stamp in my DT pkg, I thought it would make an absolutely perfect card to put a smile on his face.P1020790 copy

I used a June Release stamp by Chrissie Armstrong called Not Fat, Fluffy!! (my new favorite saying). To make the inside a little "egg-stra" special, I wrote in "Sorry to hear you've been "Cooped Up!"  Ok, enough sic humor.

Materials used:  Stamps: Not Fat, Fluffy!! SU sentiment, White Cougar Card stock, Memento Tuxedo Black Ink, Copic Markers:  R08, YR68, Y11, Y15, Y35, C0, C4, E21, E29, Y26, Y28. From Stash:  Maribou feather, jute twine, button, microfine black pen, SU embossing folder.  Red and Orange cardstock, Mustard Seed Distress ink (tag).

Misc. Details:   "Chicken Scratch" doodles were penned in around the outer edge of the image and four tiny holes were punched in the hay bale to insert knotted jute.  The little chick in the foreground was stamped, cut out and popped up over the jute.  If I could have found some yellow maribou in dh's fly-tying stuff, it would have been popped up behind the chickies to make them fluffy ......  but no such luck.  I did kidnap a brown one and popped it behind the matted image to add some interest.  Did you notice the chicken track stamp across the bottom of the background?

Hope today is "Egg-stra" special for you, wherever you may be.  Remember, Stamp up a Storm, Ink up a Whimsy Wish, and send it on to someone to make their day!

Rubber hugs, Whimsy Wishes,

Tuesday, June 18, 2013

Sweet Sparkle

P1020778 copyHi all.  Madge here for a second card for Try It Out Tuesday and a sneak peek of a gorgeous Wee stamp called Sweet Sparkle.  When I opened up my DT package this little image literally fell into my hands, I took it as a "sign" and immediately stamped it, colored it, and here is what I came up with.
Isn't she sweet!!  Unfortunately, I grabbed a piece of white cardstock which wasn't great for copic markers (it bled).  Thank goodness for the "copic eraser" I was able to push the color back and then used W0 to shade around the image. Phew!
Materials:   Sweet Sparkle, Memento Tuxedo Black ink, Copic Markers:  R00, E11, R20, E40, E33, E35, E39,BG10, BG01, BG05, BG11, G14, YG01, YG07, Y38, Y13, W0.  Sakura White and Starburst pens, Floral Explosion DP, Glossy Accents, Dazzling Diamonds (sprinkled onto glossy accents on flowers). Gumball, Pacific Point, Vanilla cardstock, Ribbons, Fern Punch and Flatback Pearls from stash.
Head on over to the Whimsy Blog to see all the beautiful creations by the talented Whimsy DT, you will be glad you did.
Til next week,  "Stamp up a storm, ink up a wish and send it on to make someone's day!

Try It Out Tuesday

Hi all.  Happy Summer!! 

I've been away from crafting for a bit, and my mojo has taken a creative beating.  I've got a quick post today for you using "something old", mainly because the card that I had intended to showcase is a new release - it will have to be for "show and tell" next week .

P1020768 copy I love this image because whenever I look at it I think of "The Sound of Music", The hills are alive with the sound of music....... "Sun Kissed" from the Little Cottage Cuties Collection illustrated by Elisabeth Bell.

I used the negative die cut and framed my colored image, machine stitched the frame to the image and added a border punched rectangle backed by poppy red cardstock.

Materials used:  Stamp: "Sun Kissed" from the Little Cottage Cuties Collection, Cougar white cardstock, Memento Tuxedo Black ink, Copic markers: R00, R20, E11, E40, E33, E34, E37, BG90, BG93, BG95, R22, R24, R08, Y18, YR16, G82, G40, G21. Flowers from Whimsy Buds, Lovely Tape, MS Border / Corner punch, paperclip and butterfly from stash.

Check out the Whimsy Blog for the new releases for June - they are absolutely wonderful!  And remember, "Stamp up a storm, ink up a wish and send it on to someone to make their day"

Rubber hugs, Whimsy Wishes,

madge0902 (1)

Tuesday, June 4, 2013

Try It Tuesday

Hi all for another "Try It Tuesday".  Can you believe that June is upon us?  Almost summer and we haven't had a Spring yet.  My dh says, "it always evens out", so I hope we have a long summer flowing into a warm autumn.

I've got two cards for you today, showcasing a Momas stamp set of 9 (3 images and 6 sentiments) called "Hibiscus and Lily.  Both of the colored images are one and the same.  This morning I had the card on the far left completed.  I love CAS, but it was boring me and I couldn't find just the right embellishment........  Later, I attacked the card and tore off the matted image, fussy cut the image, popped it onto a sponged piece of cardstock and the card you see on the right is what I ended up with.  Rummaging through my stack of drawers, I found a piece of metallic mesh, which I laid over white cardstock and sponged with color.  I think I should have held out for jP1020728 copyust the right embellishments for theP1020689 copy CAS card, what do you think?


(I apologize for the camera picking up the glare of the glossy accents.

P1020731 copyMaterials used:  Hibiscus and Lily, sentiments and image, Cougar White Cardstock, Memento Tuxedo Black ink, Copic Markers:  R24, RV23, RV29, R20, G28, YG63, YG24,  SU colors:  Purely Pomegranate, Pixie Pink and Apricot Appeal.  Cardstock:  Regal Rose, Black and Melon Mambo, and of course, glossy accents. Mesh and butterfly from stash.


Holy Catfish!  I just noticed a Sale going on in the Whimsy Store!!!  10% is nice, but how does 20% feel!!!!  Twice as good!!! Head on over and snap that rubber up before your favorite stamps are sold out!!

Until next week, "Stamp up a Storm, Ink up a Wish and send it on to someone to make them smile".

Rubber hugs, Whimsy Wishes,

Tuesday, May 28, 2013

Try It Tuesday....... aka Trials and Tribulations...lol

To all of you in the US, I hope you had a marvelous long weekend enjoying Memorial Day. Here in Canada we had our long weekend last week and the weather actually cooperated.

Last week I mentioned attempting to make a card from one large circle - The ideas started flowing from my one idea and I must say, I ended up with something that is quite different from my original thoughts.
  P1020658 copy
I started with an 8 1/2" circle (cut from a salad plate). Then someone turned the light switch on and I remembered I have a Cricut (sheesh)!

My sample will be using an 8 1/2" scalloped circle cut from DSP.

This is long and involved so run and take a potty break and grab a cuppa.....
Version ONE and TWO to follow........with the hint of VERSION THREE.


Start with one large circle: 
You will also need:
Scoring tool,  bone folder, ruler, pencil and scissors.

P1020670 

Step One: I started with an 8 1/2" scalloped circle. Regardless of the size you start with, scalloped or not, score a horizontal line 2/3 of the way down your circle, (which will be the height of your card).  Mine will be 5 1/2".
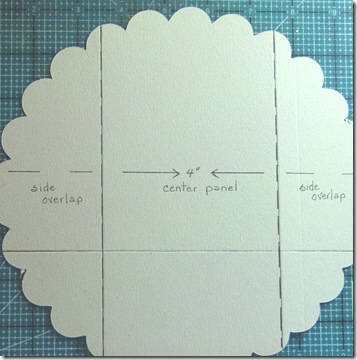


P1020672Step Two:  Divide your circle into three parts vertically making the middle section  slightly less than the sum of the two sides. ie:  2 1/8", 4 and 2 1/8".
This is where my card took a different turn as to what was originally intended.  I had planned on using the image I used, but the idea of a shell popped into my brain.
VERSION ONE:


My Step Three: I scored at 2 1/8" and 6 1/8" on the bottom section below the horizontal score line. 


P1020684 copy

Step Four:  Mark the center panel in half along the horizontal score line.  Score diagonally from the lowest points of the scallops in only the right and left sections to the center point.


P1020685      


***  Correction:  The bottom Mountain Fold is a cut to 1" from center mark on each side leaving 2" for a hinge.

P1020658 copy


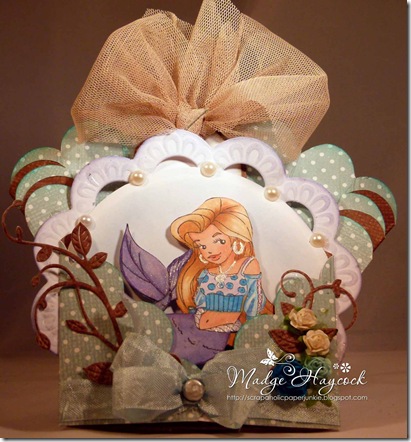
Here is my card once again.  As you can see the fanned effect has disclosed the other side of the DSP.


P1020666 copy


This shows the gatefold open exposing all of the Elisabeth Bell image, "Bonita", which was cut out and pop dotted onto a circle die and sponged with Lavender ink. The sky and a land scene were sponged on with TH Distress Inks.

P1020662 copy


A tag with a big fluffy brown toule bow was added, along with a sea green taffeta bow and pearl brad. 
Materials and Supplies:
May Release "Bonita" by Elisabeth Bell, Cougar paper for copic markers, Copic Markers:  R00, E11, R20, E50, E31, E33, E34, V00, BG10, BG43, V00, V04, V15, C1, C4.  Sakura Glitter Pen, Vines Die Set and Assorted flowers from Whimsy Buds.  From stash:  DSP, tag die cut, toule, taffeta ribbon, brad and flatback pearls.


Now back to the original plan.......  VERSION TWO

Step Three:  Cut along the horizontal score line to the vertical score line from left and right side.  The center panel remains scored.
P1020676
P1020677 copy


Step Four:  Crease fold lines with a bone folder. Remember, innie goes outie - meaning indention of score line faces out.


Step Five:  Overlap top left and right flaps.
P1020678 copy 


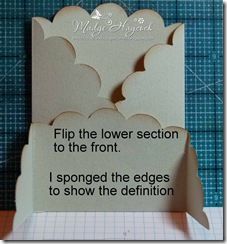
Step Six:  Flip lower section to the front.  At this point you can adhere this section to the back making a pocket. 


P1020679 copy


Step Seven:  It is your choice to adhere the front gatefold to the back gatefold or close with a bellyband.
I apologize for not decorating this version as time did not permit. 


How about VERSION THREE using an 8 1/2" x 8 1/2" piece of DSP.  Following the same principal it would become a Double Gatefold Card.
That is it for today - Remember,  "stamp up a storm, ink up a wish and send it on to someone to make their day!!"
 
madge0902 (1)

Monday, May 20, 2013

WHIMSY "Try It Tuesday" #15

OMG!!  Hang onto your sox people -- it is June NEW RELEASE DAY for WHIMSY....... and if you love water as much as I do, (even bottled) you will LOVE, LOVE, LOVE this months' releases.  I have a smattering of them in my hot little hands......and I am IN LOVE!!  Ideas are exploding from my well-earned silver haired head --  like a bag of popcorn in a microwave.
I have a quick and easy-peasie masculine card for you today, just in time for Father's Day.........  dressed up with a smattering of feminine touches to "pretty-it-up" add some interest. This ship is breathless........  I always think of my Dad when I see a sailing ship.  Dad came to Canada from England working on a vessel much like this one, running away from home at the age of 14, after my widowed Grandmother remarried. 
P1020627 copyOK,  I do get carried away with memories at times - so let's get on with the real reason for this post.  WHIMSY "TRY-IT TUESDAY #15!!! 
The base card uses a 4 1/4" x 11" piece of cardstock, scored in half at 5 1/2".  The secret to the edge of this card is finding a border punch that punches a full border, punching from one side. (this one is the fancy lace border from SU)  Leaving a center panel (1 3/4" in this case) to be decorated with a DP (or not).
Now for the image.  I stamped the ship once onto a piece of mottled blue DP (from stash) and twice onto white cardstock. Working from the background of the sails, pieces were cut from the stamped white images and glued over the DP image for a 3D look.  The paper pieced image was cut into a 3" circle and matted with a slightly larger die cut and sponged with TH Tea Dye Distress Ink. Two copic markers (BV13, BV17) were used to darken the areas of the inside area of the ship and the water. A Sukura White Pen was used to give the illusion of whitecaps on the water. Really easy-peasie would be to stamp the image onto the white cardstock and sponge a sky / water background. (I always do things the hard way).
P1020621 copy This Stamp Set, (3 images and 3 sentiments) is such a mystery, I don't even know it's name!!
Do check into the The Whimsy Stamps site to see all the goodies and  the Whimsy Blog to see all the delicious-ness the DT creates.
Materials used:  Mysterious New Whimsy  Release, Memento tuxedo black, TH Tea Dye Distress ink, 1/2 sheet of Card stock, 1/4 sheet of card stock, pieces of White Cardstock (copic) and DP, Copic markers:  BV13, BV 17, Ribbon and flat back pearls (from stash). Double border punch,
P1020629 The cutouts on the front of the card limited the sentiment size so it wouldn't peek through. A die cut similar to the front image was cut rom contrasting cardstock, then a sponged sentiment was 3D taped to the die.
A wide bow to the bottom of the card and flat back pearls to the punched border were added for a feminine touch interest.
Hope this has given you some inspiration to "stamp up a storm, ink up a wish and send it along to brighten someone's day".
Next week, I will attempt to show you a different card fold from one very large circle.  See you then!madge0902 (1)

Tuesday, May 14, 2013

Try It Tuesday - for Whimsy Stamps

Hi all.  I hope your week has been full of sunshine and the warmth of Spring.  Here in the interior of BC it has been weird.  Tonight a thunderstorm took our power out and brought a torrential downpour of chilling rain.  Thus a very quick and cute card for Try It Tuesday.
Have you seen the latest stamp sets from "2 Cute Ink"??  They are so adorable! I'm using one of the images and a sentiment from the "Crafty Cats" set today.  P1020617 copyTake a look at the complete set of 3 images and 5 sentiments - do you have a friend who loves sewing, knitting or crocheting? This is a purrrrr-fect set to have.  *NEW Crafty Cats

Materials used:   Crafty Cats by Heidi Schwoerer, Cougar white copic card stock, Memento Tuxedo Black ink, Copics: E93, E97, BG10, BG04, Oval and Scalloped Oval die cut, scalloped border punch, SU embossing folder, seam binding and brad, DP from Echo Park. From Stash, brown, aqua and vanilla cardstock.
Sometimes CAS (clean and simple) is best.  I'm feeling very under the weather with bronchitis, so today, CAS is mandatory.
Until next week, "Stamp up a storm, ink up a wish and send it on to someone to make their day."
Rubber hugs, whimsy wishes,[madge0902%2520%25281%2529%255B4%255D.png]

Tuesday, May 7, 2013

Try it Tuesday # 13

Hi all, for another "Try It Tuesday" for Whimsy Stamps.  I've constructed a Center Step Card for you today using a set from Monika Martinson (Momas) called Build a Rose Bush.
P1020601 P1020605
I don't have a tutorial for you today, but I will give you the measurements.
I started with a piece of 6" x 11" white cardstock. I used 100lb weight cardstock for a sturdy card.  (The EK Success Lattice Border punch measures 1 1/4". )  Both the left and right side were punched on the long edge, starting at 1 1/2" from bottom to 1 1/2" at the top. If not punching - then cut a line - by measuring over 1 1/4" and cutting a vertical line from 1 1/2" bottom to 1 1/2" top.  The 3 1/2" Center panel  was scored in half, at 5 1/2".  A mountain fold was created at the 1 1/2" mark for each side panel and a valley fold 1" from that. Close your card at this point and it will create a natural fold for the two side panels.  A spellbinders die was used to create the scalloped bottom edges.  The white panels are matted with a Bo Bunny DP.  The image from "Build A Rose Bush" was stamped onto Cougar White cardstock for copics with Memento Tuxedo Black, colored with copic markers and die cut using the overlapping image technique.  The inside is matted with the same Bo Bunny DP with a Scalloped Circle stamped with "Life is a sweet bouquet of special moments"
I'm not totally happy with this card and if I had another 4 hours, I would do it over from scratch, but I do need to sleep:( I'm hoping that you will take the Center Step card idea and try one for yourself.  Finished card measures 6" x 5 1/2" and folds flat for mailing at regular postage.
Materials used:  Build A Rose Bush, Cougar White Cardstock (for copics), Memento Tuxedo Black ink, Copic Markers:  RV10, RV21, RV23, RV29, YG93, G40, YG63, YG97, Viva Decor Gold Pearl Pen (centers of flowers),  Tim Holtz Frayed Burlap, Spellbinders large scallop die, and oval die, EK Success Lattice Border Punch, Bo Bunny DSP from stash.
Remember, Stamp up a Storm, Ink up a Wish and send it on to someone to make their day.
madge0902 (1)

Tuesday, April 30, 2013

Try It Tuesday - Rose is on the move

Hi all, I keep believing that Spring is going to appear any day now.  Wherever Rose is, there is spring and she's on the move - Riding her bicycle in the glorious sunshine and fresh, clean air.  P1020580 copy
I've used a wonderful stamp, that I've been eyeing for quite a while - Rose's Bike Ride, a Wee Stamp for Whimsy Stamps.  While rummaging through old card ideas, I came upon a template for a "Simple Slider Card", and decided that Rose would be a great example.  The tutorial for the card, can be found here.  I have adapted the measurements to suit the image.
My card measures 6 1/2" x  5 1/2".  I started with a piece of Cardstock measuring 12" x 6" scored at:  1/2"; 5 1/2";(mountain folds) 10 1/2"; 10 3/4" 11 1/4" and 11 1/2".  (Valley folds).  I started a tutorial, but my eyes gave out along with my camera battery.  
P1020588 copy
Notice that Rose slides to the right when the tag is pulled.  I haven't stamped the tag as yet - but will add a signed sentiment before the card is given away.
Materials used: Rose's Bike Ride, Cougar White (copic card stock), Memento Tuxedo black ink, Copic Markers:  R00, E11, R20, E30, E31, E34, E37, BG01, BG05, B04, BG10, BV02, C0, C01, YG24, Sakura Stardust Pen, Sakura White Gel Pen. 
Materials from stash:  Flowers, Ribbon, Brad, Grass Punch, MS Border / Corner punch, Butterfly charm, Stickles.
My intention was to cut Rose out, however, cutting off all the beautiful squiggles that add such wonderful detail to the stamp would have been lost - so a messy cut was what happened.
Remember, Stamp up a storm, ink up a wish and send it on to someone to make their day.
madge0902 (1)

Monday, April 29, 2013

Whimsy "Try it Tuesday" #11

Did you miss last Tuesday's Newsletter?  Totally my fault.  We changed location and our cable / wi-fi was not hooked up to send.  It took a couple of days to get back on track - but thankfully tech support managed to fix the situation.  Never-the-less, this should have pre-posted from my home computer - and it didn't - My old brain is not clever enough to try to second guess an electronic device. 
I have a short, but sweet, post for todays "Try It Tuesday" using a sweet digital image with a bonus Sentiment set from StampArt Design called Ari & Toby. Kathryne has captured these sweet little children at their cutest.
P1020534 copy
Materials used:  Toby & Ari, by StampArt Design, Cougar White (copic paper), Memento Tuxedo Black ink, Mustard Seed (Tim Holtz distress ink), Glossy Accents (puddle and butterfly), Copic Markers:  R00, E11, R20, E30, E34, E35, R22, R23, R24, R29; BG10, BG13, BG31, C4, C7
From Stash:  Gathered Lace, Friends button, Flowers,Butterfly punch,  and leaf punch.
The image was colored and easily cut out to be popped on top of the DP with foam dots for dimension. The sentiment was cut in a circle and sliced to fit under a slit in the rainbow DP (Websters Pages). Glossy Accents were added to the puddle, Butterfly and bow on the umbrella.
Until next time - "Stamp up a Storm, ink up a wish, and send it on to someone to make their day."
Rubber hugz, Whimsy wishes,
madge0902 (1)